Zynq-7000 AP SoC Spectrum Analyzer part 2 - Accelerating Software - Building ARM NEON Library Tech Tip 2014.3
Zynq-7000 AP SoC Spectrum Analyzer part 2 - Accelerating Software - Building ARM NEON Library Tech Tip 2014.3
Table of Contents
Document History
| Date |
Version |
Author |
Description of Revisions |
|
| 23 October 2014 |
1.0 |
Faster Technology |
Initial posting - updated to 2014.3 |
|
| Date |
Author |
Comment |
||
|---|---|---|---|---|
Description/Summary
Many systems that can take advantage of the processing capabilities of the Zynq-7000 AP SOC involve complex calculations used in filtering, video manipulation, and signal processing in general. To demonstrate the performance gains by optimizing complex calculations for the Neon SIMD engine included in the Zynq Processing System (PS) of the Zynq family of devices versus running it on the base ARM 9 processor requires finding or creating a set of appropriate functions of sufficient complexity. This Tech Tip describes the process of obtaining and building a set of filtering functions targeting the Zynq-7000 ZC702 demonstration platform. In subsequent Tech Tips, the download and building of this library will be verified and then used to build an application.
An open source project within the ARM community is in place to provide a "library of common useful functions accelerated by NEON that applications developers could just pick up and use". This has evolved into the Ne10 Project and the Ne10 library. Information on the project can be found at
http://www.projectne10.org/.
The library contains the following functions:
| Math Functions |
Vector and Matrix algebra functions |
|
| Vector Add |
Vector Add for Float data - 2 2D, 3D, 4D vectors |
|
| Matrix Add |
Matrix Add for Float data - 2X2 to 4X4 |
|
| Vector Sub |
Vector Sub for Float data - 2 2D, 3D, 4D vectors |
|
| Vector RSBC |
Vector sub from a constant - 2D, 3D, 4D vectors |
|
| Matrix Sub |
Matrix Sub for Float data - 2X2 to 4X4 |
|
| Vector Multiply |
Vector Multiply by constant or other Vector |
|
| Vector Multiply - Accumulator |
Vector Multiply / Accumulate for Float data |
|
| Matrix Multiply |
Matrix Multiply for Float data - 2X2 to 4X4 |
|
| Matrix Vector Multiply |
Multiply Matrix by Vector X2, X3 or X4 |
|
| Vector Div |
Vector Divide by constant or other Vector |
|
| Matrix Div |
Matrix Divide for Float data - 2X2 to 4X4 |
|
| Vector Setc |
Sets Vector to a constant or Constant Vector |
|
| Vector Len |
Length of 2D, 3D and 4D vectors |
|
| Vector Normalize |
Normalizes array of Vectors - 2D, 3D or 4D |
|
| Vector Abs |
Absolute value of Input Vector(s) |
|
| Vector Dot |
Performs Dot product of two vectors - 2D, 3D, 4D |
|
| Vector Cross |
Cross product of two vectors |
|
| Matrix Determinant |
Determinant for 2X2, 3X3 or 4X4 Matrix |
|
| Matrix Invertible |
Find Invertible of Matrix for 2X2, 3X3 or 4X4 |
|
| Matrix Transpose |
Find transpose of Matrix for 2X2, 3X3 or 4X4 |
|
| Matrix Identity |
Find Identity Matrix for 2X2, 3X3 or 4X4 |
|
| Signal Processing |
||
| Complex FFT |
CFFT/CIFFT for Radix 4 binary lengths from 4 to 32768 |
|
| FIR Filters |
Finite Impulse Response Filter on Float data |
|
| FIR Decimator |
Optimized FIR and Decimator function |
|
| FIR Interpolator |
FIR and Interpolator using Polyphase structure |
|
| FIR Lattice Filters |
FIR Lattice using feedforward structure |
|
| FIR Sparse Filters |
Sparse FIR for simulating reflections, etc. |
|
| IIR Lattice Filters |
IIR Filter with feedforward and feedback |
|
| Real FFT |
Real FFT and Real IFFT for Float data |
|
| Image Processing |
||
| Hresize |
Interpolation of horizontal data |
|
| Vresize |
Interpolation of vertical data |
|
| Img_rotate |
Rotate image by 90 degrees |
|
| Box Filter |
||
| Physics |
AABB |
Compute AABB for a Polygon |
| Sample Functions |
Code samples for calling NEON, etc. |
Implementation
| Implementation Details |
|
| Design Type |
PS Only |
| SW Type |
PetaLinux Linux |
| CPUs |
1 CPU - standard ZC702 Frequency |
| PS Features |
ARM Processor and NEON SIMD enginer |
| PL Cores |
None |
| Boards/Tools |
ZC702 with standard peripherals connected for base TRD demonstration |
| Xilinx Tools Version |
Vivado / SDK 2014.3 |
| Other Details |
No other cables or connectivity required |
Step by Step Instructions
Obtaining the Library and Setting up the Workspace
From the link to the ProjectNe10 site mentioned previously, the library of functions discussed on the site can be found at
https://github.com/projectNe10/Ne10
Using your favorite web browser we review the library before downloading it.

If we look inside the modules/dsp folders we can see that there are FFT, IIR and FIR filter routines with both standard C and Neon specific implementations as well as a test suite provided in the /modules/dsp/test folder. Based on the filtering functions listed, this looks like a good starting point for our subsequent application development so we will download it.
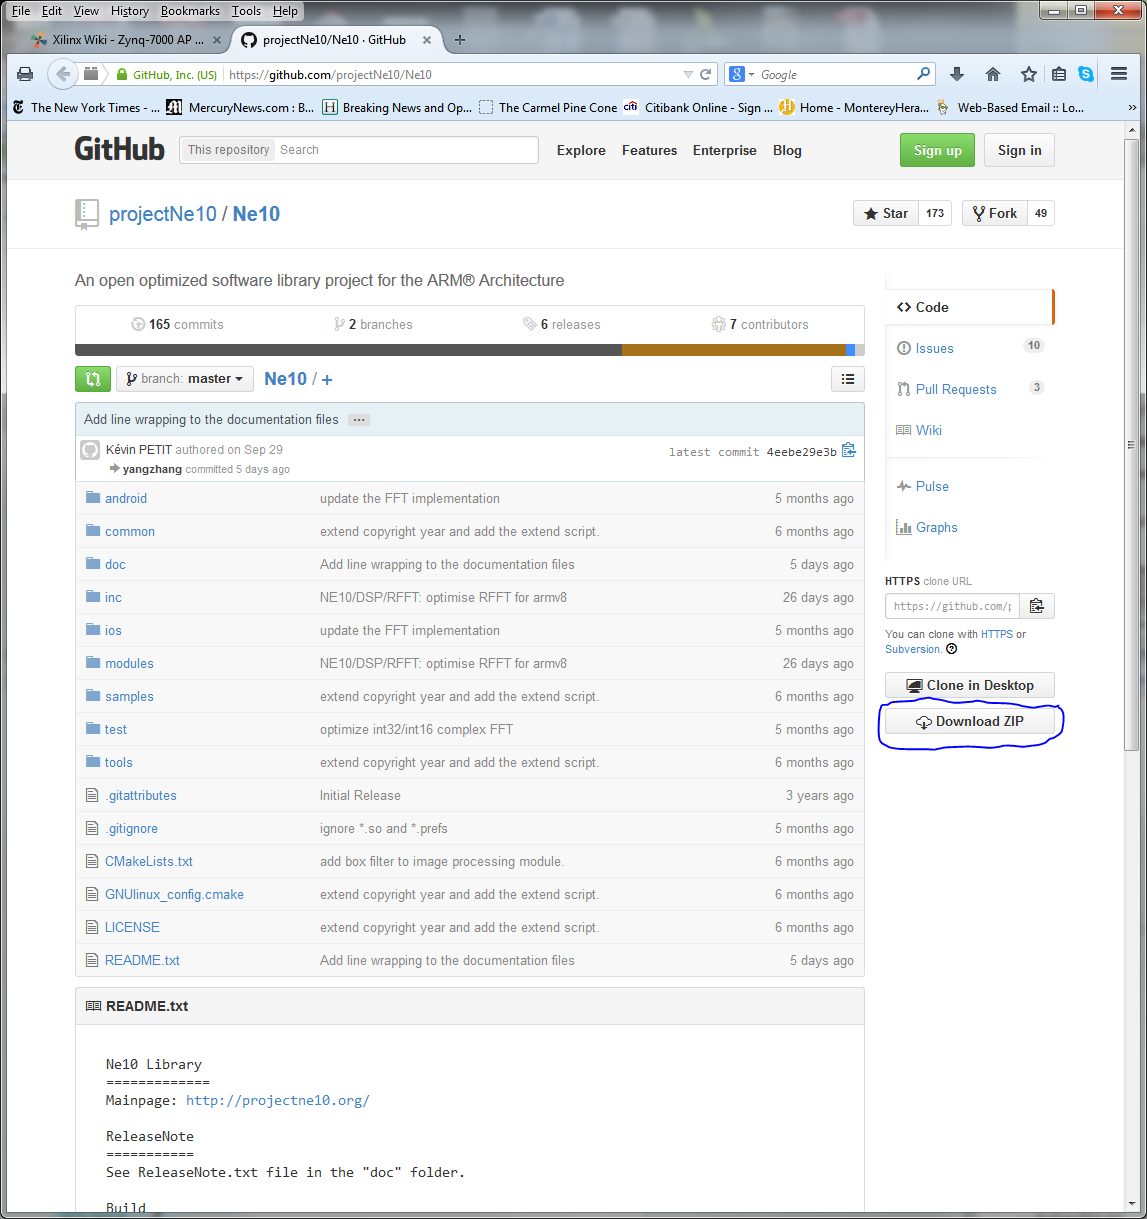
Click on the "Download ZIP" button on the right side to download the zip of the full archive as shown below.
CAUTION:
Be sure to select the link from the page shown above. If you are on the main page for the Ne10 project, be sure to select the link that is associated with the word "zip" in the line:
You can download this project in either zip or tar formats . If the text link to use git for the download is selected, problems may arise later in this Tech Tip.
For Linux users a tarball is available at https://github.com/projectNe10/Ne10/tarball/master
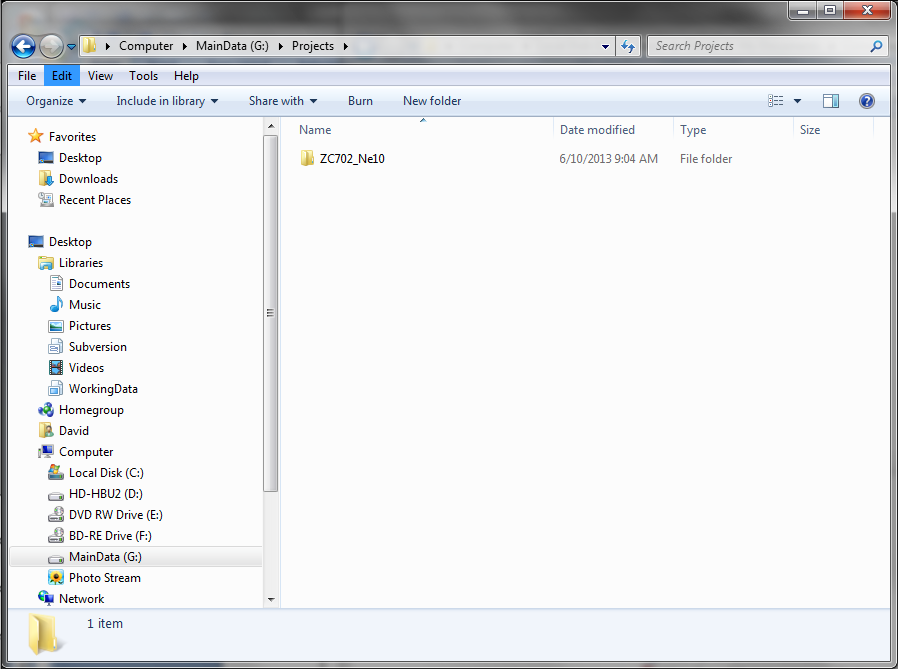
To keep this Library development project separate, we created a new project off the root of our G: drive at G:/ZC702_Ne10.:
We can now unzip the downloaded library into our new project folder
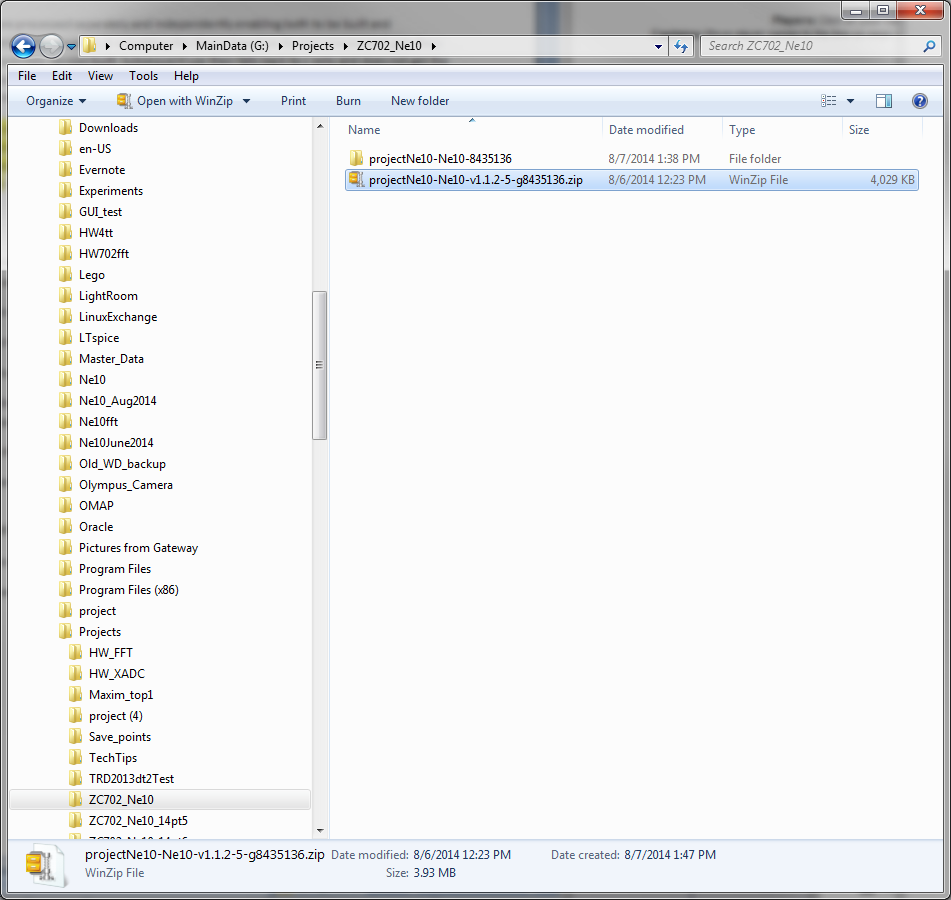
NOTE: The library name now includes a designation that can be used to determine the revision of the library. The zip file of the library has the revision embedded in the file name as shown in the list above. This version is v1.1.2-5. If you do not have the version with the embedded version number, go back to the download process and be sure that you have chosen the proper link to the zip file.
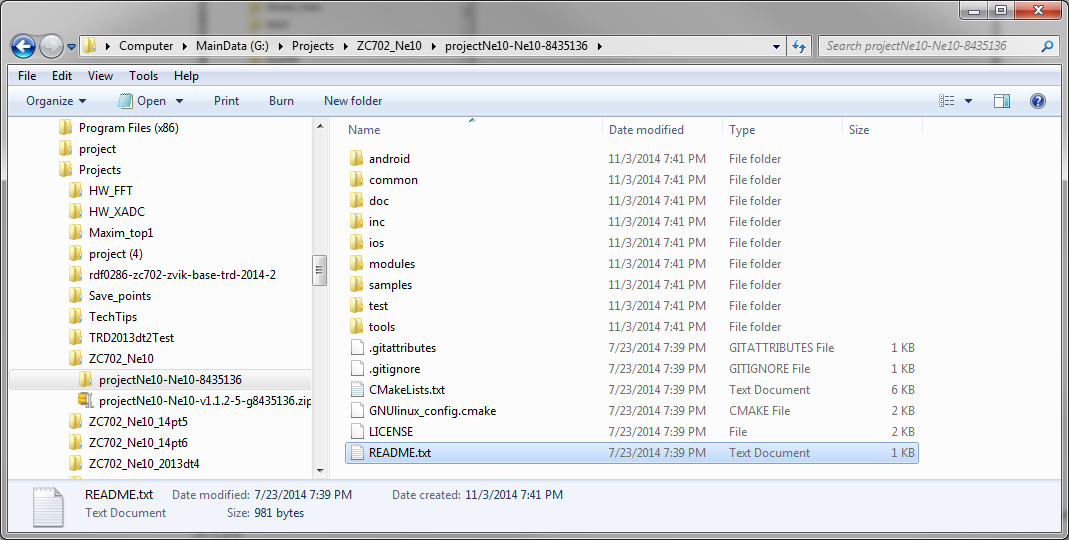
Documentation for the library is embedded in the structure of the library using a process supported by the doxygen tools (http://www.stack.nl/~dimitri/doxygen/). A README.txt file at the root of the library has basic instructions on using doxygen to extract the full documentation set from the library. The doxygen tools must be installed to use the embedded documentation
In a subsequent Tech Tip we will be building a signal processing system using the FFT functions so this is an appropriate library. Many other uses are possible so we will build the complete library as opposed to just the subsequently required FFT functions.
Before proceeding, we need to make a slight modification to the library so it will build properly within the SDK environment.
Open the dsp folder in the modules folder to reveal the contents. Note the three source files highlighted in the listing below.
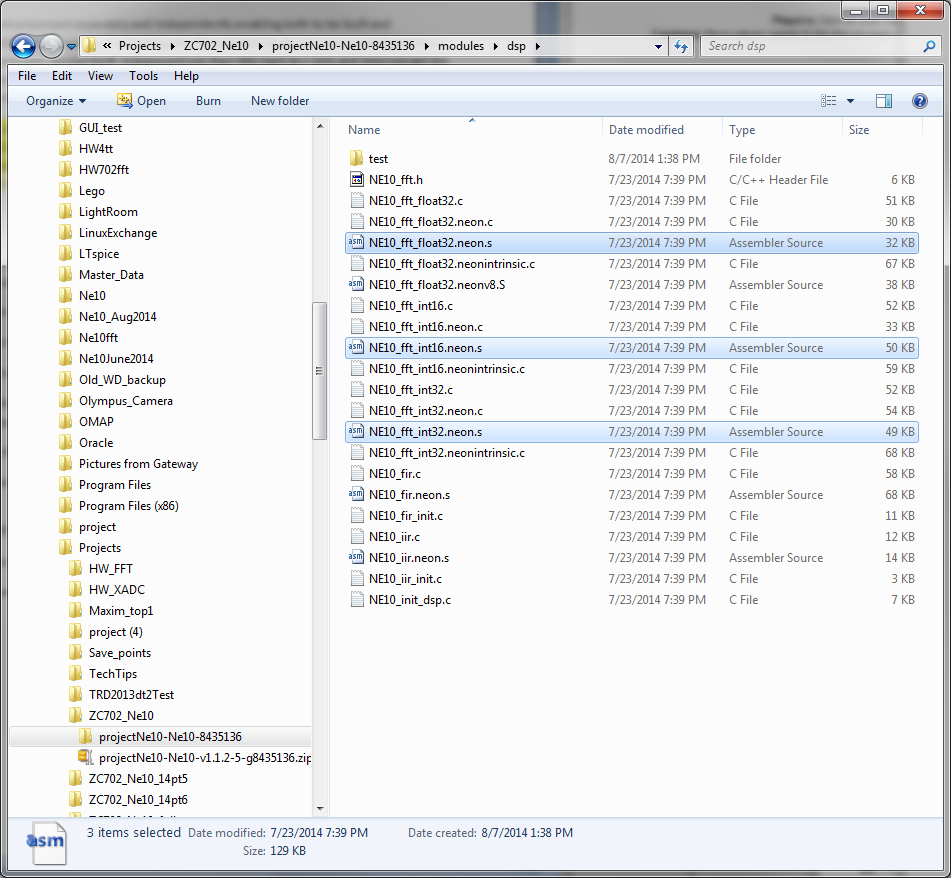
These files have the same base file name as their .c counterparts. The .s versions are hand coded assembly routines specific to the NEON SIMD engine in the ARM processor system in the Zynq-7000 AP SoC device. In the build environment assumed by the Ne10 project, the c files (.c extension) and assembly files (.s extension) are processed separately and forced to remain separate throughout the process. In SDK, there is no readily available means to accomplish this separation. As a result, depending on the order of processing within the build, the assembly versions may not get handled properly resulting in loss of the NEON specific assembly language routines and the performance gains they would enable.
To circumvent this potential issue, we simply add ".asm" to the .s files to force them to be handled separately. Simply edit the file names so they appear as shown below.

Base TRD
This Tech Tip and subsequent Tech Tips in the series depend on a specific version of the TRD running on the ZC702. Specifically the PetaLinux based 2014.2 version.
The specific contents of the TRD are not required at this time. However, the user MUST have downloaded and verified operation of the ZC702 with the 2014.2 version of the TRD. The balance of the Tech Tips in this series assume that the ZC702 is running the 2014.2 version from the SD card. Instructions on how to download the TRD, build the proper SD card image and verify proper operation with the ZC702 can be found in the Technical Article Zynq Base TRD 2014.2
Building Ne10 Library
With the Ne10 library downloaded and proper operation of the ZC702 with the 2014.2 Base TRD verified, we now run SDK to build the Ne10 Library.
Start -> All Programs -> Xilinx Design Tools -> Vivado 2014.3 -> Xilinx SDK 2014.3
In the Workspace Launcher, browse to and select Projects\ZC702_Ne10
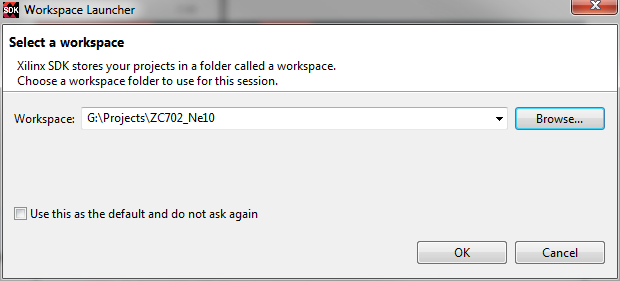
Click OK to continue.
If you are presented with a welcome tab, close it by clicking on the X on the tab.

The downloaded Ne10 software is comprised of two main areas; an executable test program and a library of optimized functions that are used by that test program.
CAUTION:
The Ne10 library is supplied with Make files to build it directly under Linux, ios or the Android OS. Because we are using SDK and the target is our ZC702 development board, we need to do things a bit differently.
We will start by importing the Ne10 project into our workspace and then will build the library elements separate from the executable test program.
To import the Ne10 project, we first create a new project which will contain the library source and then import the file system into that project area.
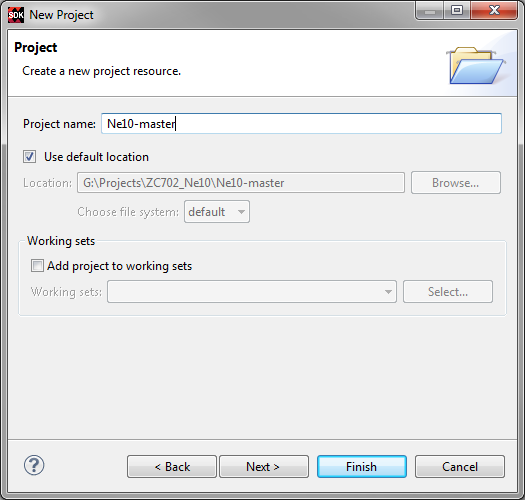
Select File -> New Project
In the pop up window, expand General and select Project

Click Next
The Project creation dialogue box opens. In the Project Name: box type Ne10-master to match the name of the repository.
Make sure the check box on the default location is checked and then click Finish
We now have a project area in our workspace for the Ne10 library
We now import the full repository into the project just created.
Select Ne10-master in the Project Explorer window then right click on it to get the pop up window, then select Import
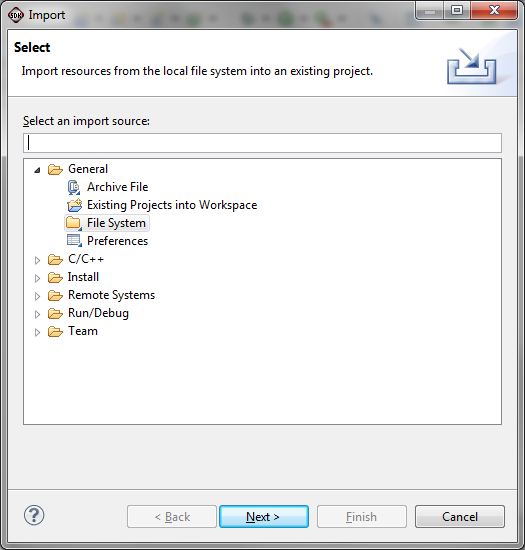
Expand the General category and select File System

Click Next
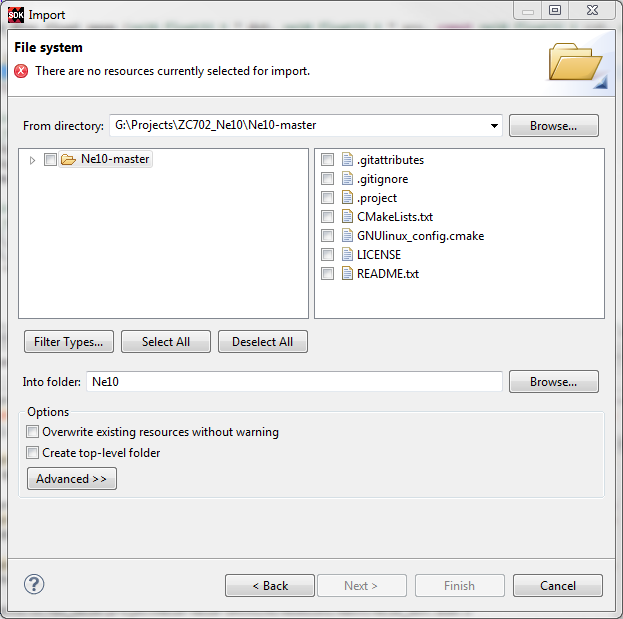
In the From directory: box, Browse to where the files were un-zipped earlier and select the top level location of the repository and click OK

Note that there are no resources selected. Either click Select All or check the check box next to the projectNe10 folder.
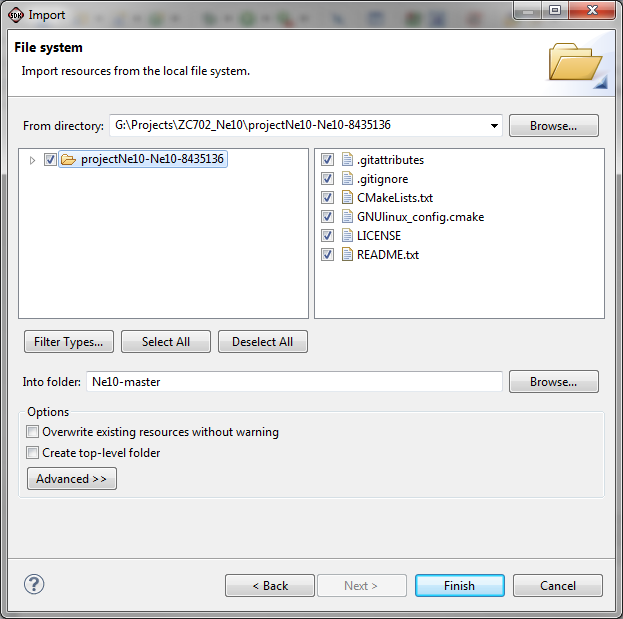
The warning message should go away and the Finish button is active. Click Finish to import the repository into the SDK workspace.
The next step is to create a project to build the library.
The new project Wizard, as used in the previous project creation step, can be used or since we know this is a C project we can go directly to the C project creation screen.
Select File -> New -> Project. Then expand C/C++ and then select C Project and click Next to go to the C project creation screen.
Shortcut:
Right Click on the blank space in the Project Explorer pane and select New -> C Project.
We will call this project Ne10; enter this in the Project name: entry box.
NOTE:
Because this is a library that we will use later, be sure to select the ARM Linux Static Library by clicking on it or the box next to it. The Toolchains: entry should automatically be Xilinx ARM GNU/Linux Toolchain.

Click Next
The Project Configurations screen will open.
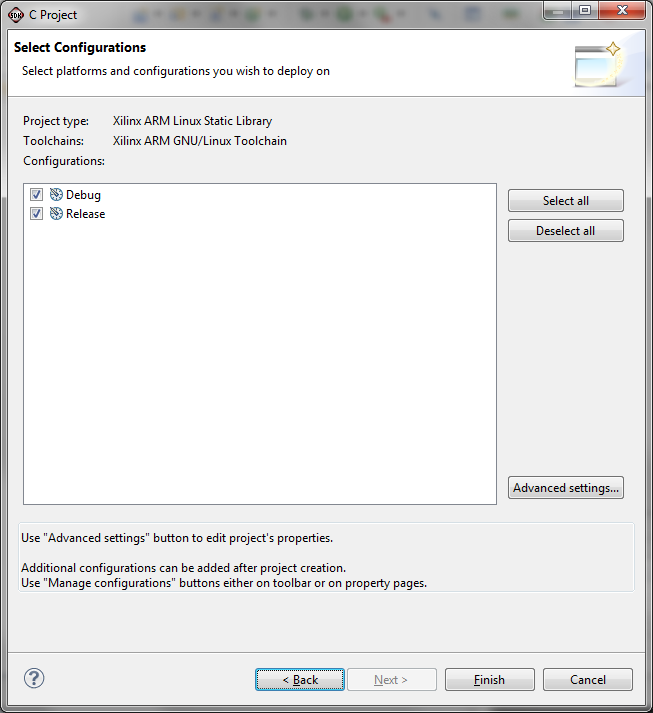
Click Advanced Settings. You may get a warning dialogue box about changing configuration settings. If so, Click OK.
This next series of steps is referenced later as "adding the paths step".
In the Properties for Ne10 screen, expand the C/C++ General line and select Paths and Symbols.
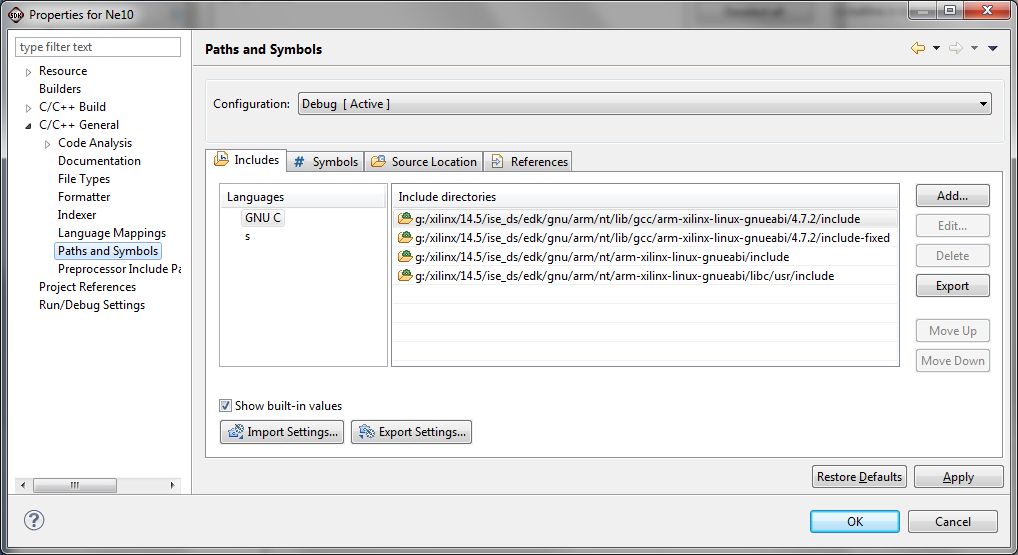
In the Configurations: box, be sure that either Release [ Active ] or [ All Configurations ] is displayed. If Debug [ Active ] is displayed, The compiler will automatically default to minimum optimizations and insert extra instructions to aid in debug. As we want to achieve the highest performance possible, we want to be sure to use "Release" settings wherever possible.
Be sure the Includes tab is active.
Click the Add button
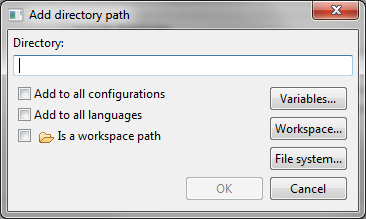
In the Add directory path window, check all of the options boxes and then click the Workspace button.
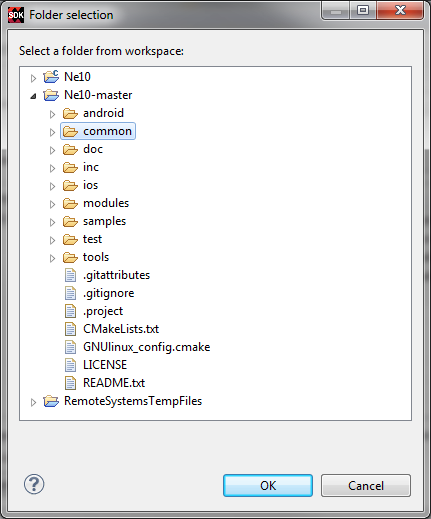
From the Folder selection window, select the Ne10-master / common folder, and click OK.
When the Add directory path window re-appears, click OK.
Using the same steps, add the following folders:
- Ne10-master / inc
- Ne10-master / modules / math
- Ne10-master / test / include
- Ne10-master / test
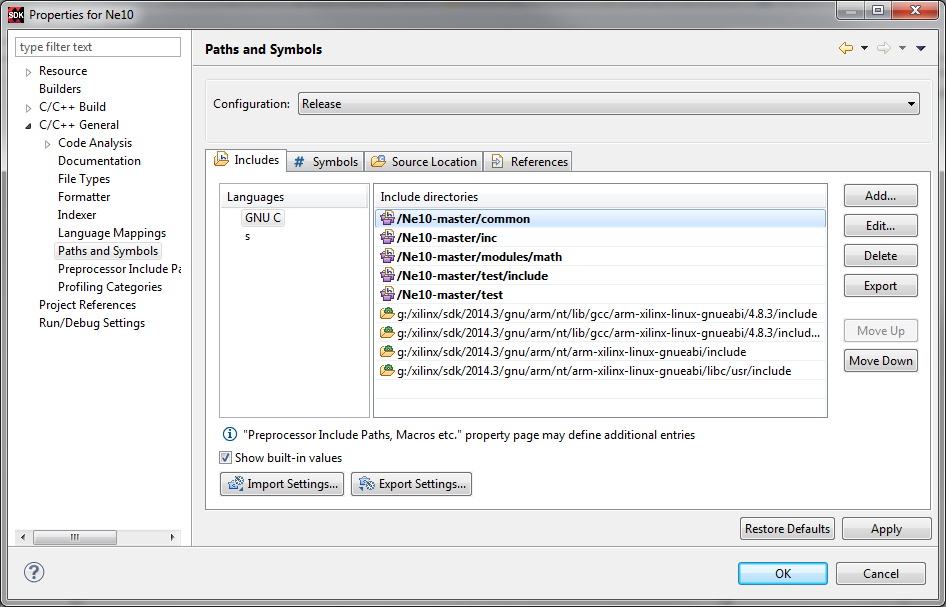
NOTE:
In the Add directory path window, you can select the workspace first and then check the check boxes before clicking the final OK.
We will now tell the toolchain which version of the ARM processor we have. This will enable those portions of the code that use the NEON SIMD extension to be properly compiled for it.
Expand the C/C++ Build line in the left column and select the Settings line.
Be sure the ARM Linux gcc assembler is selected in the left column.
In the Expert settings: Command line pattern: box, add -mcpu=cortex-a9 -mfpu=neon any place after ${COMMAND} leaving a space before and after the added string.
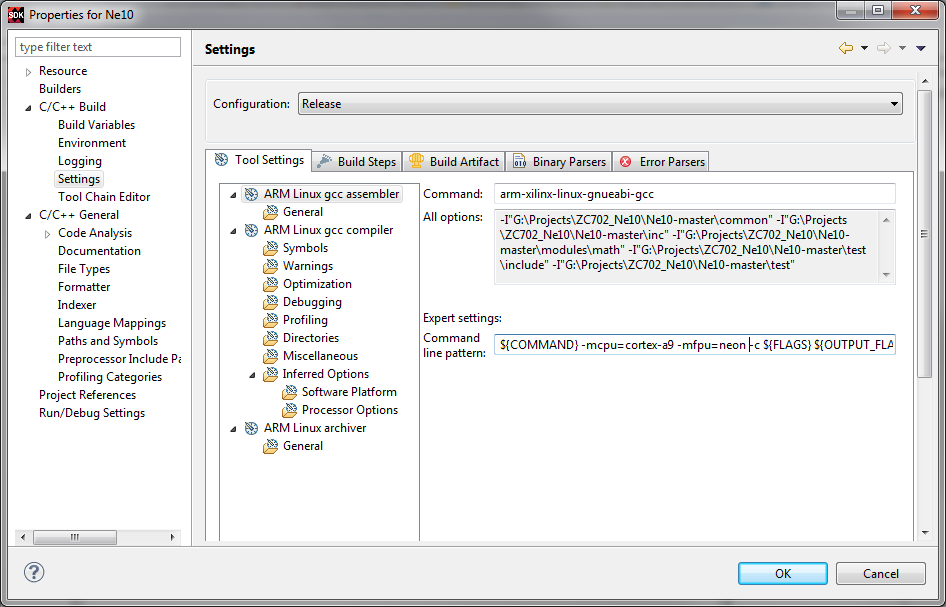
Similarly, select the ARM Linux gcc compiler line and add the same string to the Command line pattern box
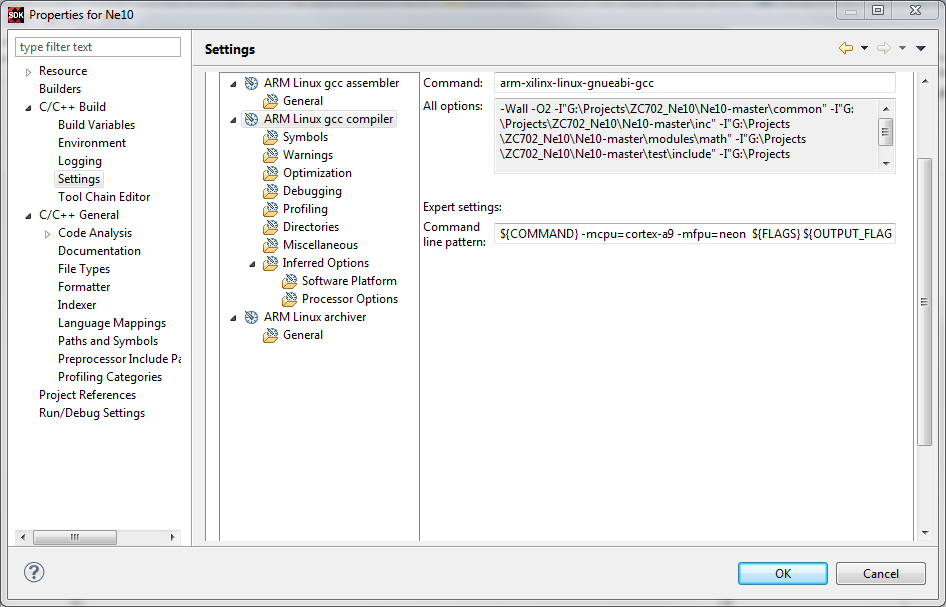
Click the General line under ARM Linux gcc assembler.
Verify that the include paths have the same entries as previously added to the compiler Paths and Symbols.
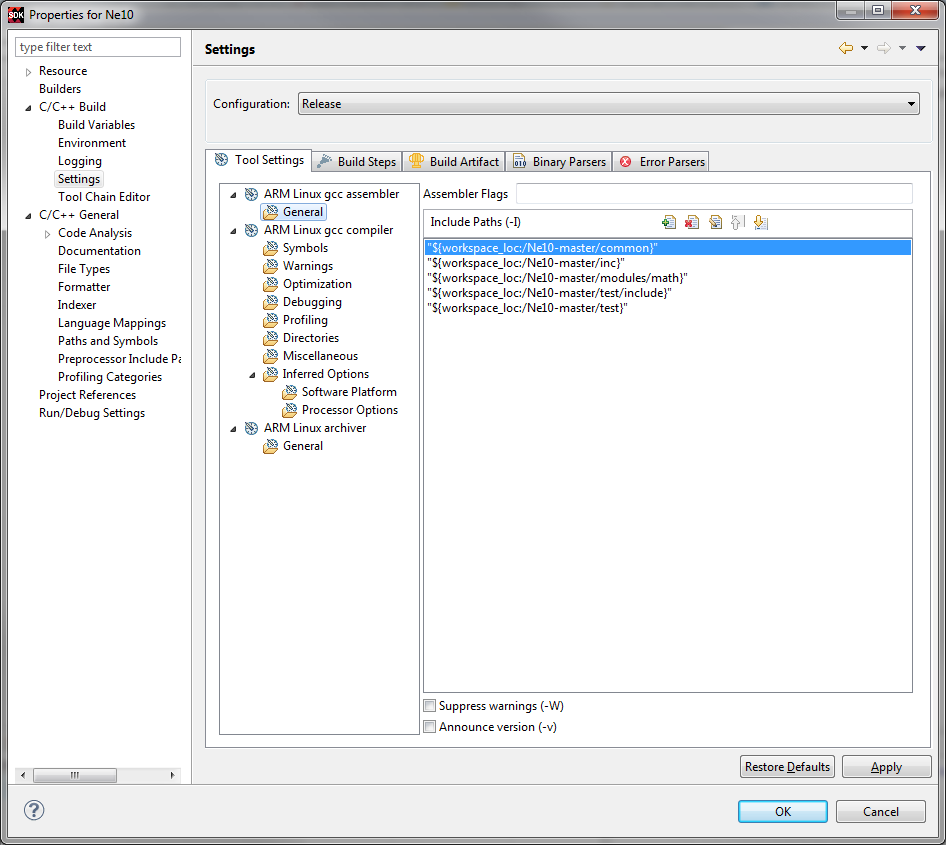
If the Include Paths for the Assembler are NOT in place, use the "adding the paths step" procedure previously described (click the paper icon with the plus sign, etc.) and add the same paths as was done for the Compiler.
Click Apply to save these settings.
Click OK and then Finish to complete the changes to settings.
The next step is to add the source code for the library items to the project.
NOTE:
Because some of the items in the repository are the operating code versus the library items, we will selectively add the source in a set of repeated steps.
In the Project Explorer window, select the Ne10 C project, and right click on it. Select Import from the popup menu. Expand the General folder, and select File System.
Click Next.
In the From directory: box, Browse to your project workspace, select Ne10-master and click OK.
CAUTION:
This MUST be the Ne10-master that is in the workspace directory as shown below.
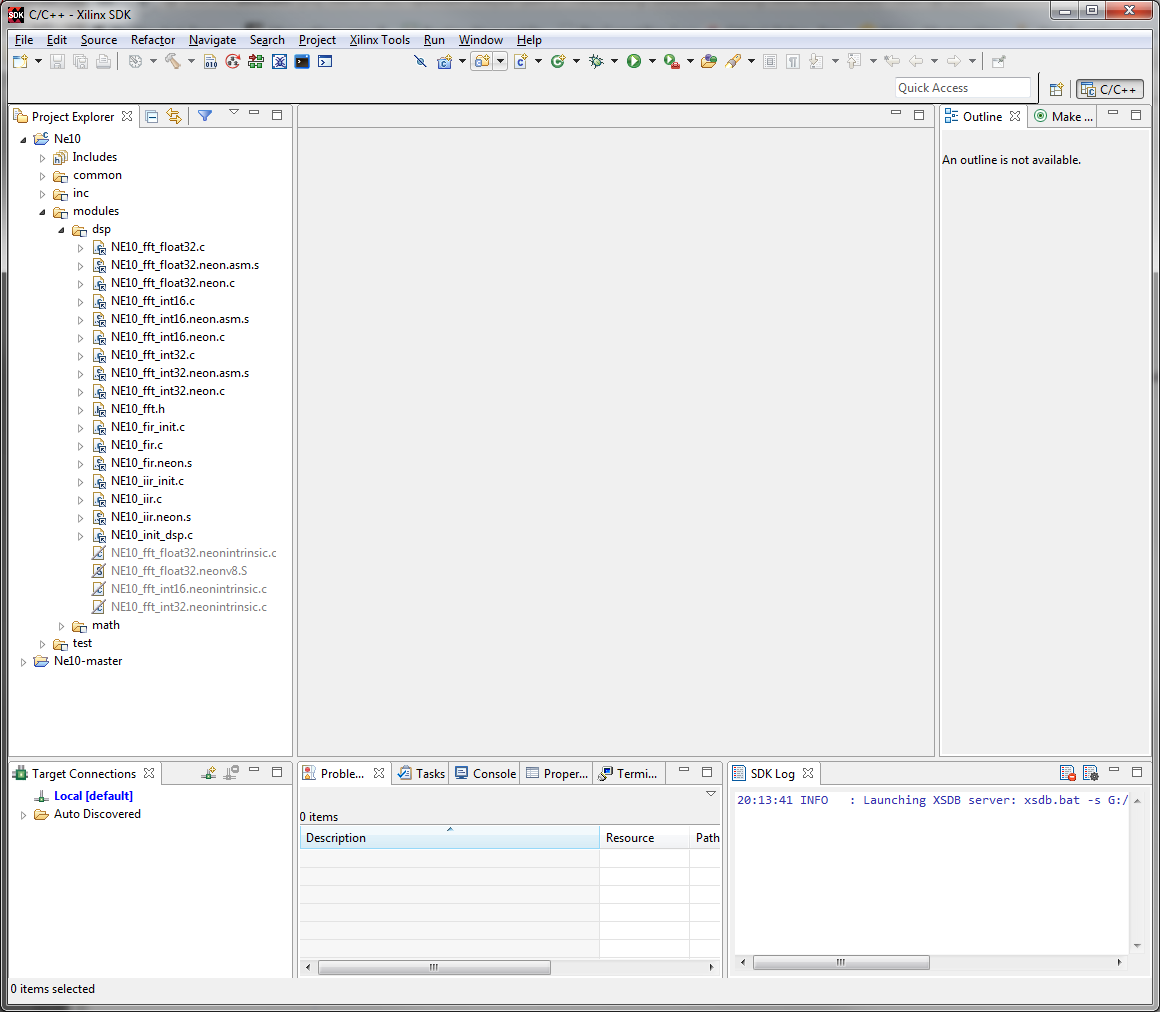
Expand the Ne10-master folder to show the sub-folders and expand modules/dsp, modules/math and test.
Click the appropriate folders so the following are selected:
- common
- inc
- modules / dsp
- modules / math
- test
Be sure those not listed are not checked. We have included the test directory because it has functions that will be used in subsequent Tech Tips. For general use of the library, select only the test / include sub directory.
Click on the Advanced button to see the extra options.
Select all of the options. If the Create Link Locations relative to: is not set to WORKSPACE_LOC, click the drop down and select it from the list. You should have the following:

Click Finish
With the library now imported, we can build it.
In the dsp portion of the library there are a few files that need to be excluded from the build process:
- NE10_fft_float32.neonintrinsic.c, NE10_fft_int32.neonintrinsic.c and NE10_fft_int16.neonintrinsic.c are older versions of the c and assembly routines before they were split into separate .c and .s files
- NE10_fft_float32.neonv8.s is an optimized assembly library targeting the 64 bit version of NEON in some newer ARM implementations
We will use the "Exclude from Build" capability within SDK.
Right Click on one of the files, select Resource Configuration > Exclude from Build
In the dialog box click Select All and then OK

Do this for each of the files mentioned above. The result should be as follows:
Notice how the four files are grayed out and their icons are slashed.
To assure the best execution times, we want to build with Release compiler default options. To set this,
Right click on Ne10 in the Project Explorer, select Build Configurations > Set Active > Release
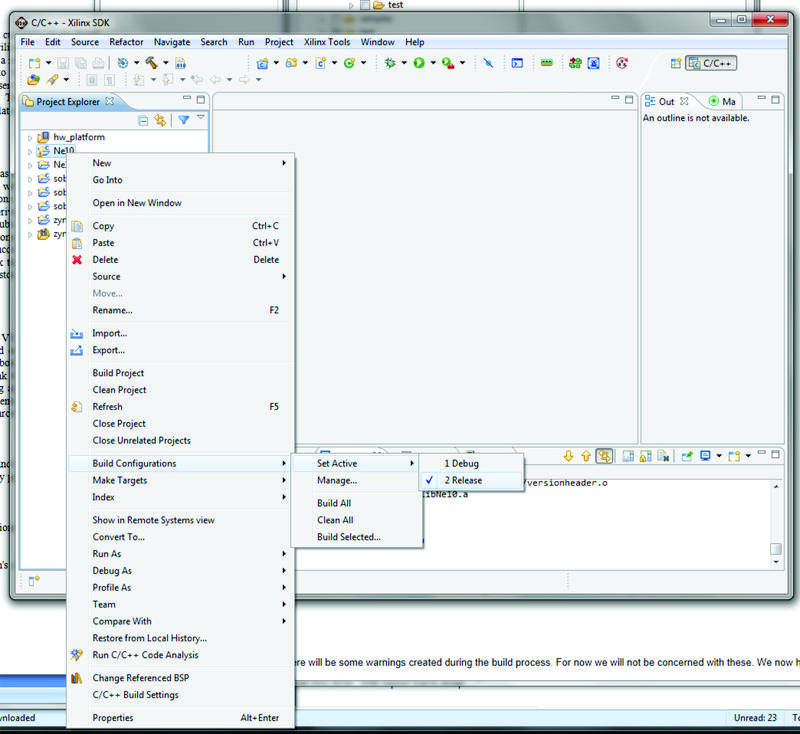
Select Ne10 in the Project Explorer window, right click on it and select Build Project.
There will be some warnings created during the build process. For now we will not be concerned with these.
We now have the library built and ready to use.

The Ne10 Library includes test code to verify the correct operation of the library. There is also a test option that provides a performance comparison between the standard C code running on the processor and the same code optimized and running on the NEON SIMD engine. "Zynq Ne10 Testing Tech Tip" is a follow on Tech Tip that describes the process of building and running these tests.
Saving the workspace
For ease of completing subsequent Tech Tips that use this library, it is wise to save the workspace so it can be restored later as a known starting point. If you choose to do this,Select File -> Export or right click on the white space in the Project Explorer pane and select Export.
In the Export dialogue box expand General and select Archive File
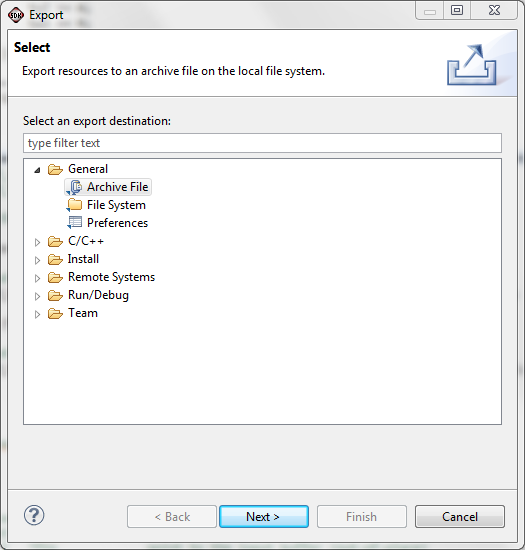
Click Next
The Export Archive File dialogue will appear
Click the Select All button to select the full workspace (or select each project while not selecting the RemoteSystemsTempFiles as these are not needed for the restore)
Click the Browse button and navigate to where you want to save the workspace and then create an appropriate file in which to save the workspace. In our case we are saving this to Ne10LibraryBuild2014dt3.
Be sure the save in zip format is selected unless you are on a Linux system in which case you might select the tar format.
Then click Finish
The workspace will be saved in the specified archive file for later use.
Conclusions:
Inclusion of standard ARM processors in the PS of the Zynq-7000 AP SoC enables users to take advantage of the large infrastructure of products and services that has been developed worldwide for these processors. Importing into the Xilinx SDK software libraries that are separately developed and tested facilitates rapid implementation of standard functions used across a wide variety of industries and applications.
List all the steps to run the design. This includes hardware, software and tools needed.
© Copyright 2019 - 2022 Xilinx Inc. Privacy Policy