Zynq-7000 AP SoC - Installing the Ubuntu Desktop on PetaLinux and Demo Tech Tip
This page is deprecated and is no longer being updated. The content is being retained for reference. For more information about running Ubuntu on Zynq UltraScale+ MPSoC, please refer to Canonical Ubuntu
| Date | Version | Author | Description of Revisions |
| 10/10/2013 | 1.0 | chandramohan pujari | Initial draft |
| 22/5/2014 | 1.1 | Chandramohan pujari | Source Formatting Done |
| 2015-Dec-04 | 1.2 | Nathalie Chan King Choy | Added an Appendix B for 2015.2 TRD with newer Ubuntu version |
1. Summary
The Ubuntu Desktop provides a rich graphical environment upon which developers may develop their custom applications requiring graphical user interfaces. This Tech Tip is Intended to enable user to run complex operating system like Ubuntu on Zynq peta-Linux platform. This also demonstrates the capability of Zynq to act as a general purpose CPU.Entire content of this tech tip is developed based on Zynq Base TRD. In order to support HDMI Display for Ubuntu Gnome (unity) we have taken hardware reference from Zynq Base TRD (Target Reference Design) which implements a Xylon graphics Controller IP for HDMI display.Base TRD also Supports few other QT based video tests which we can safely ignored at this point of time as we intend only to use HDMI interface. Latest Base TRD is developed upon peta Linux platform. Please refer to below Link for further details on design of Base TRD and installing peta Linux to run Base TRD http://www.wiki.xilinx.com/Zynq+Base+TRD+2013.2.
In order to boot zynq from SD card following items should be placed in the SD Card.
a) Ubuntu Desktops' Root file system.
b) boot.bin (boot image)
c) image.ub ( peta Linux image consists of kernel image, device tree blob and minimal rootfs).
The step by step instructions section provides all the details on generating/obtaining the above items and bring up Ubuntu desktop on Zynq peta Linux platform. It also provides details on sections of Base TRD that needs to be emphasized in order to obtain these items.
1.1 Assumptions
User has already Installed peta-Linux environment and is familiar with Zynq boot sequences.For reference, Details on peta-Linux Installation and other resources refer to Appendix A.
1.2 Prerequisites
- ZC702 Evaluation board with required licenses
- A Linux development PC with the ARM GNU tools installed
- A Windows 7 PC with vivado 2013.2
- Ease Us Partition Master 9.2.2 software installed on Windows 7 PC. Please refer to Appendix A for downloading this software.
- A 8 GB or larger SD card
- A SD card reader and Win32DiskImager.exe tool for writing the precompiled *.img. provided with this tech tip.Please refer to Appendix A for downloading this software
2. Implementation
| Implementation Details | |
| Design Type | PS & PL |
| SW Type | Peta Linux and ubuntu Desktop |
| CPUs | 2 ARM Cortex-A9 @ 667MHZ each |
| PS Features | 1) DDR 2) VDMA 3) I2C |
| PL Cores | 1) HDMI receiver (ADV7611) 2) Xylon FB controller IP. |
| Boards/Tools | 1) ZC-702 2) HDMI Monitor |
| Xilinx Tools Version | 1) vivado 2013.2 |
| Other Details | 1) HDMI to DVI Connector 2) LAN cable 3) USB to Diligent Converter for Connecting Mouse and keypad 4) UART connector cable. |
3. Attachments
| Files Provided | |
| image_files.zip | Archived design files projects |
| zc702_precompiled_image.zip https://www.xilinx.com/member/forms/download/xef.html?filename=zc702_precompiled_image.zip | pre-compiled image for flashing on the SD card |
4. Step by Step Instructions
This section takes you through the process of Obtaining/generating the HDL design and required binaries for completing this exercise. Aligning with Base TRD, The complete set of instructions can be broadly classified in to following categories.- Building the FPGA Hardware Bit stream and FSBL
- Installing peta-Linux and Building BSP for Base TRD
- Customizing Linux Device tree blob (devicetree.dtb)
- Setting up the SD card
- Obtaining Linaro Ubuntu Desktop (rootfs)
- Running the Ubuntu Desktop
- Applying the required packages
4.1 Details
- Building the FPGA Hardware Bit stream and FSBL:
Sections 3 and 4 of Base TRD would explain "how to build the FPGA Hardware Bit stream and FSBL" using Vivado 2013.2 tool. The output of this process is a system.bit file and zynq_fsbl.elf files. - Installing peta-Linux and Building BSP for Base TRD: Peta-Linux SDK BSPs provide a complete, integrated and tested, Linux operating system for Xilinx devices. Follow Section 5 till 8 of Base TRD to obtain the installation tar ball of peta-Linux SDK on your Linux System and build the BSP for Base TRD. Then Follow section 10 and 11 to build the peta-Linux and generate the boot Image for the design provided. The output of the section should yield boot.bin and image.ub.
- Customizing Linux Device tree:
The Linux Device tree blob generated can be found at
$PETALINUX/software/linux-2.6.x/arch/arm/boot/dts/Xilinx-zc702.dts
- "root=/dev/mmcblk0p2".
After Modification the command would like
- "setenv bootargs console=tty0 console=ttyPS0,115200 root=/dev/mmcblk0p2 rw earlyprintk mem=768M".
Optionally we can remove the static IP address to enable DHCP. Apart from this the the SD boot should also be modified as follows
- fatload mmc 0 0x3000000 ${kernel_image} && fatload mmc 0 0x2A00000 ${devicetree_image}; bootm 0x3000000 - 0x2A00000.
Save the current changes and Recompile to generate a new peta Linux binaries. Compilation steps are mentioned in section 10 of Base TRD.
4.1.1 Setting up the SD card
In order to bring Ubuntu desktop, the SD card needs to be formatted and should contain two Partitions- A FAT32 partition for Zynq Boot Images and
- An ext3 or ext4 partition for root file system.
User can use the precompiled image provided with this tech tip and write it on to SD card using "Win32DiskImager.exe" tool. The step to be followed are
- Extract the content (*.img) file present in the zc702_precompiled_image.zip file to local disc.
- Place the SD card in card reader and connect to the windows pc.
- Now execute the "Win32DiskImager.exe" and provide location of the image file and select the SD card Drive.
- click on write. Wait for few seconds to finish the operation.
- SD card is ready with the requested image programmed on it.
User can manually create these partitions and write the files to SD card. There are multiple ways to create above partitions on a SD card.
If user is using a linux machine, and prefers a command line option, then please refer to the Xilinx wiki page for SD partition from command line on a Linux Machine. http://www.wiki.xilinx.com/Prepare+Boot+Medium#boot-mode-sd
If user is using a Ubuntu Linux development PC, and prefers a UI based tool for partition, SD card can be formatted using Gparted tool.
However, Here we are going to demonstrate partitioning of SD card on windows PC using Ease Us Partition Master tool.
- Launch the Ease US Partition master tool by clicking on start > All programs > EaseUS Partition Master 9.x.x
- Select partition Manager option available on the left side as shown in figure 1.0 below
 |
| Figure 1.0: Launch Ease US |
Figure 1.0
up on selection of the partition Manager, you would have the following screen as shown in figure 2.0
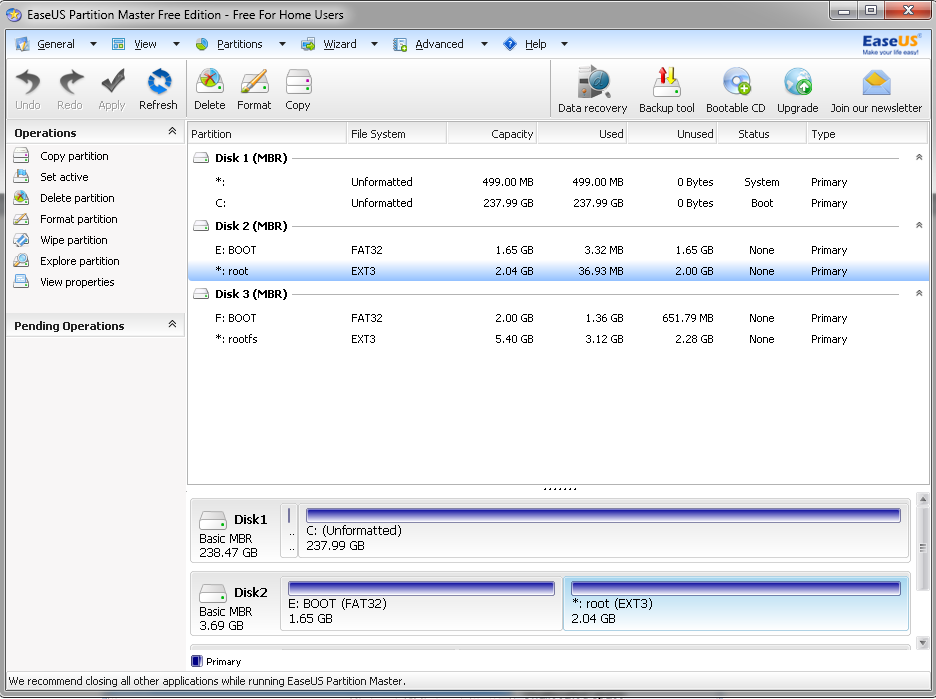
Figure 2.0
Select your SD card, Format and Delete the existing partitions.Make sure you back up the data before you proceed for deleting and formatting
To Format the SD Card: Right click on SD volume and select delete volume (if any) or select Format partition.
4.1.2 Creating Partitions
Creating a FAT32 partition is illustrated in figure 3.0: Right click on SD volume and select create partition by updating the following
Figure 3.0
The Figure 3.0 shows how to select the 1.5 GB space for FAT32 partition on a 4 GB SD card.However if you are using a larger Card, you may allocate more space as required and rest of the space will be used for rootfs. Make sure you allot at-least 2.5 GB of space for rootfs. This will help in customizing and download different packages on need basis.
Creating a ext3 or ext4 partition is illustrated in figure 4.0: Right click on SD volume and select create partition and update the following

Figure 4.0
Click on apply and to reflect the changes and perform the requested operations on the SD card as shown in figure 5.0.

Figure 5.0
4.1.3 Obtaining Linaro Ubuntu Desktop (rootfs)
The rootfs "linaro-precise-ubuntu-desktop-20120626-247.tar.gz" or the latest version can be download from its source location by executing the commands as stated below.wget http://releases.linaro.org/12.06/ubuntu/precise-images/ubuntu-desktop/linaro-precise-ubuntu-desktop-20120626-247.tar.gz
Extract the contents of the rootfs directly on to SD media card which is inserted on you linux PC using the below command.
sudo tar --strip-components=3 -C /media/rootfs –xzpf linaro-precise-ubuntu-desktop-20120626-247.tar.gz binary/boot/filesystem.dir
If you are facing some issues while extracting the rootfs please see the Appendix A for a workaround.
4.1.4 Running the Ubuntu Desktop
Copy the generated Boot.Bin, image.ub files to FAT32 partition of SD card. Set the boot mode to SD. SD boot mode can be set by setting the switches of the zynq board as shown below in figure 6.0.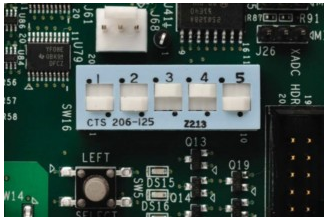
Figure 6.0
This allows the ZC702 board to boot from the SD-MMC card. If you are using a Rev C board which does not have switches as shown below, then use the following jumper settings:
J21: 2-3,
J20: 2-3,
J22: 1-2,
J25: 1-2,
J26: 2-3
Insert the SD card on to the board and power-on the board, Ubuntu desktop should be up and running within few moments.
4.1.5 Applying the required packages
Further applications can be downloaded and installed using apt package manager of Ubuntu. Make sure that you have a network cable connected to the board and the http proxies (For accessing internet) are set. You may notice that the apt manager might not work sometimes even though your network connection is enabled, this could be because your system is behind a proxy server. To configure proxy server for apt, open /etc/apt/apt.conf file with root permissions and add the following line to the file“Acquire::http::proxy "http://username:passsword@domain:port/"; “
The zc702_precompiled_image.zip is a customized image. It automatically launches the following applications upon booting ubuntu desktop.
- Fractal viewer running Mandelbrot set
- Doom Game
- Launches a Shell with Top command running in it
- Libre Office running a power point presentation.
In order to get these applications integrated with the rootfs, refer to the details provided in Appendix A.
5. Appendix A
- Peta-Linux Installation and other resources:
Information related to Peta Linux and other resouces can be found at http://www.xilinx.com/tools/petalinux-sdk.htm. - Ease us partition Tool
The tool can be downloaded and installed from http://www.easeus.com/partition-manager/ - win32DiskImager.exe Tool
The tool can be downloaded and installed from http://sourceforge.net/projects/win32diskimager/ - Workaround for Permission issues on generic Linux PC while Extracting the RootFs
Sometimes due to permissions, the root file system might not extract as expected, here is a workaround to bypass this problem with generic Linux machines. The workaround is to extract them on the Zynq board itself. The steps are given below.
a) Copy the tar ball on to FAT file system of the SD card.
b) Download the 14.5 pre-built images and copy them to SD card.
c) Now Set the Boot Mode to SD and power on the board by inserting the SD card.
d) Mount both the partitions (FAT32 and ext3) of the card as stated
Mkdir –p /mnt/boot
Mkdir –p /mnt/rootfs
Mount /dev/mmcblk0p1 /mnt/boot
Mount /dev/mmcblk0p2 /mnt/rootfs
cd /mnt/boot;sudo tar --strip-components=3 -C /mnt/rootfs –xzpf linaro-precise-ubuntu-desktop-20120626-247.tar.gz binary/boot/filesystem.dir - Applications integrated with the precompiled rootfs
- XaoS: Xaos is an interactive fractal viewer, allowing the user to continuously zoom in or out of a fractal in real-time. XaoS can display many common fractal types, including Mandelbrot, Barnsley, Newton, Phoenix, and even your own custom formulas. XaoS also supports switching between Julia and Mandelbrot sets for each formula. To Install Xaos, Edit the /etc/apt/sources.list file as root
sudo gedit /etc/apt/sources.list
and make sure that the universe component is included in the source lines. It should look like this
deb http://us.archive.ubuntu.com/ubuntu squeeze main universe
After any changes you should run
sudo apt-get update
You can now install Xaos by running the below command.
sudo apt-get install xaos
Which will install xaos and its dependencies.
- PrBoom: This Classic PC Doom game. There are multiple Doom engines available for linux, including zdoom, doomsday and prboom. Prboom is released under the GPL and includes the game engine and free game media (maps, enemies, weapons, …).
sudo apt-get install prboom
If you have the original iwad files of Doom/Doom 2 or the special editions (doom.wad, doom2.wad, tnt.wad, plutonia.wad, …), copy them to /usr/share/games/doom/.
Run prboom under your user account:
prboom or prboom-iwad tnt.wad
Additional Info on prBoom: One can upgrade to prboom+ as well by downloading the tar ball ball from prboom+ source port http://sourceforge.net/projects/prboom-plus/
After getting the tar ball, unpack the tarball using below command
tar -xvf prboom-plus-2.5.1.3.tar.gz
and run the below command from the source folder.
./configure && make && make install
if there are dependency issues when running the configure script, then the below command should install all of the required packages.
sudo apt-get install libsdl-gfx1.2-dev libsdl-mixer1.2-dev libsdl-net1.2-dev
To ensure that the prboom+ binary is in your PATH, this command will place a symbolic link in the /usr/local/bin directory.
sudo ln -s /usr/local/games/prboom-plus /usr/local/bin/prboom-plus
- Libre-Office : Libre Office is a free and open source office suite, It was forked from Open Office. The Libre Office suite comprises following meta-packages
- libreoffice-writer:Word processor
- libreoffice-calc:Spreadsheet
- libreoffice-impress:Presentation
- libreoffice-draw:Drawing
- libreoffice-base:Database
- libreoffice-math: Equation editor
- libreoffice-filter-mobiledev: Mobile Devices filters
- libreoffice-filter-binfilter: legacy filters (e.g. StarOffice 5.2)
To install complete suite of libre office, execute the below command.
sudo apt-get install libreoffice-gnome
To install only part of LibreOffice, you can install the appropriate meta-package by executing
sudo apt-get install <meta-package>
6. Appendix B - using 2015.2 TRD and newer Ubuntu rootfs
If you want to use the 2015.2 Zynq Base TRD with a newer Ubuntu rootfs, there are a few extra things you'll need to do because Linaro's newer releases don't include a Ubuntu Desktop rootfs image any more, and there are some kernel options to set so that the X-windowing doesn't fail with the newer Ubuntu rootfs. These instructions assume you are working with a Linux workstation where you have your SD card plugged into a card reader.- Get the 2015.2 Base TRD files: http://www.wiki.xilinx.com/Zynq+Base+TRD+2015.2
- Get the Linaro 2014.10 release developer build, which is based on Ubuntu 14.04 (an LTS version): Go to page http://releases.linaro.org/14.10/ubuntu/trusty-images/developer/ and get linaro-trusty-developer-20141024-684.tar.gz
- If you have a Windows machine, you can prepare your SD card according to steps 4.1.1 and 4.1.2 above to partition & set them to the correct type (fat32 for boot and ext4 for rootfs). On a Linux workstation, you can use the tool "gparted" to partition & set the type.
- Untar the rootfs image into the rootfs partition:
- sudo tar --strip-components=1 -C /media/nathalie/rootfs -xzpf linaro-trusty-developer-20141024-684.tar.gz binary
- If you build the design yourself with the Xylon IP, you'll have your display timing out after about an hour, due to the evaluation version of the IP being used. Since we want to add stuff to the rootfs that will take longer than an hour to install everything, we will start off by using the pre-built BOOT.BIN that is included in the 2015.2 base TRD files "ready_to_test" folder, which has the non-evaluation version compiled in. For the moment, we don't need to modify the FSBL ELF, U-Boot ELF, nor HW bitstream, so we can use the pre-built BOOT.BIN. Copy <TRD directory>/ready_to_test/BOOT.BIN to the boot partition of your SD card.
- We do need to modify the kernel because some kernel options are needed so that the X-windowing doesn't fail with the newer Ubuntu rootfs. Follow the instructions in section 5 of this page http://www.wiki.xilinx.com/Zynq+Base+TRD+2015.2 for PetaLinux up to
- ln -sf zc702-base-trd.dts system-top.dts
- petalinux-config -c kernel
- (1) Disable PCI (CONFIG_PCI=n) because otherwise Xorg will segfault
- (2) Set CMA_SIZE_MBYTES to 128 so that Xorg doesn't throw an error: Device Drivers > Generic Driver Options > DMA Contiguous Memory Allocator > Size in Mega Bytes.
- Build & package the kernel with the modified options:
- petalinux-build
- petalinux-package --image -c kernel --format uImage
- Copy $ZYNQ_TRD_HOME/software/petalinux/images/linux/system.dtb to the boot partition of your SD card with the filename devicetree.dtb. $ZYNQ_TRD_HOME is defined on page http://www.wiki.xilinx.com/Zynq+Base+TRD+2015.2
- Copy $ZYNQ_TRD_HOME/software/petalinux/images/linux/uImage to the boot partition of your SD card
- In the boot partition of your SD card, create a file uEnv.txt with the contents:
- uenvcmd=run ubuntu_sdboot
- ubuntu_sdboot=echo Copying Linux from SD to RAM in uEnv... && fatload mmc 0 0x3000000 ${kernel_image} && fatload mmc 0 0x2A00000 ${devicetree_image} && if fatload mmc 0 0x2000000 ${ramdisk_image}; then bootm 0x3000000 0x2000000 0x2A00000; else bootm 0x3000000 - 0x2A00000; fi && echo Done uEnv
- bootargs=console=ttyPS0,115200 root=/dev/mmcblk0p2 rw earlyprintk rootfstype=ext4 rootwait
- In the rootfs partition of your SD card, create a file etc/init/ttyPS0.conf with the contents (you probably will need to use "sudo" for creating/modifying files on the rootfs partition of your SD card):
- start on runlevel [23]
- stop on runlevel [!23]
- respawn
- exec /sbin/getty -8 115200 ttyPS0
- In the rootfs partition of your SD card, open up etc/securetty for editing. If ttyPS0 isn't there, add it. If tty1 isn't there, add it.
- In the rootfs partition of your SD card, open up etc/apt/apt.conf for editing. If you need to use a proxy server, then add lines that look like:
- Acquire::http::proxy "<your proxy server>:<port #>/";
- Acquire::https::proxy "<your proxy server>:<port #>/";
- To get started, let’s set apt up to just get the minimal required packages:
- APT::Install-Recommends "0";
- APT::Install-Suggests "0";
- In the rootfs partition of your SD card, open up etc/network/interfaces. If missing, add this line:
- iface eth0 inet dhcp
- Execute the "sync" command to flush everything that needs to be written. When it completes, eject the SD card and but do not put it in your ZC702 board yet.
- Make sure you have the console connected to the UART on your ZC702 board. Cutecom can be used on a Linux workstation. Power on the board with no SD card so that it can get detected & then power it off.
- dmesg | grep ttyUSB -> look for which /dev/ttyUSBn has the USB UART
- Put the SD card into the ZC702, make sure you are in SD boot mode, and turn it on. You should come up at tty1
- Log in as root (password: linaro)
- Disable console sleep:
- setterm -blank 0 -powerdown 0 > /dev/tty1
- Make sure the ZC702 is plugged in to Ethernet. Then execute
- /usr/lib/klibc/bin/ipconfig eth0
- Then you can start to get packages. Lubuntu-desktop is a lightweight desktop. Other options could be lubuntu-core, xubuntu-desktop, etc. Getting lubuntu-desktop installed takes a few hours. (This is why we don't want the Xylon IP timing out on us while installation is happening).
- apt-get update
- apt-get lubuntu-desktop
- After the installation is complete, use the "reboot" command to reboot. You should come back up to the login prompt. You can log in as user linaro (password linaro).
http://releases.linaro.org/14.10/ubuntu/trusty-images/developer/
© Copyright 2019 - 2022 Xilinx Inc. Privacy Policy