Zynq-7000 AP SoC - Performance - Ethernet Packet Inspection - Linux - Redirecting Packets to PL and Cache Tech Tip
Zynq-7000 AP SoC - Performance - Ethernet Packet Inspection - Linux - Redirecting Packets to PL and Cache Tech Tip
Document History
| Date |
Version |
Author |
Description of Revisions |
| 14th September 2013 |
0.1 |
E. Srikanth |
Initial Draft |
Introduction
The tech tip provided here is an extension to the “Redirecting Ethernet Packet to PL for Hardware Packet inspection Techtip” provided on the Wiki page. This tech tip describes how the Ethernet data received by the Gigabit Ethernet Interface on the Zynq PS can be diverted to PL for packet inspection and moved to L2 Cache via the ACP port. This tech tip also describes the implementation of PL-based logic that performs Ethernet Packet Inspection and bifurcates the header and pay load portion of the Ethernet packet and redirects the header to the ACP port and the payload portion to the HP.The packet bifurcation was done to make sure that the processor gets the Ethernet Headers readily available for processing without invalidating or flushing the cache. This was done to put minimal and important Ethernet data required for upper layers to process.
The design files for the tech tip can be downloaded at the link given here: Zynq7000AP_SoC_Ethernet_Packet_Inspection_Linux_design.zip
Hardware Design Details
The Tech Tip as mentioned in this document utilizes an Ethernet Packet Processor IP implemented in the PL. The Ethernet Packet Processor IP is a custom IP which redirects Ethernet data received on the MAXI-GP1 port to the Accelerator Coherency Port (ACP) or the High Performance (HP) port of the Zynq Processing system. The Ethernet Packet Processor has two AXI4 slave interfaces. One of the Slave interfaces provides a control path and second slave interface provides a data path through which Ethernet packet is redirected to the fifos in the IP. The Ethernet Packet Processor is capable of the moving the into the Caches via the ACP port and the rest of the payload is to the DDR3 memory directly via the HP port.
Block diagram of the Ethernet Packet Processor IP is as shown below.
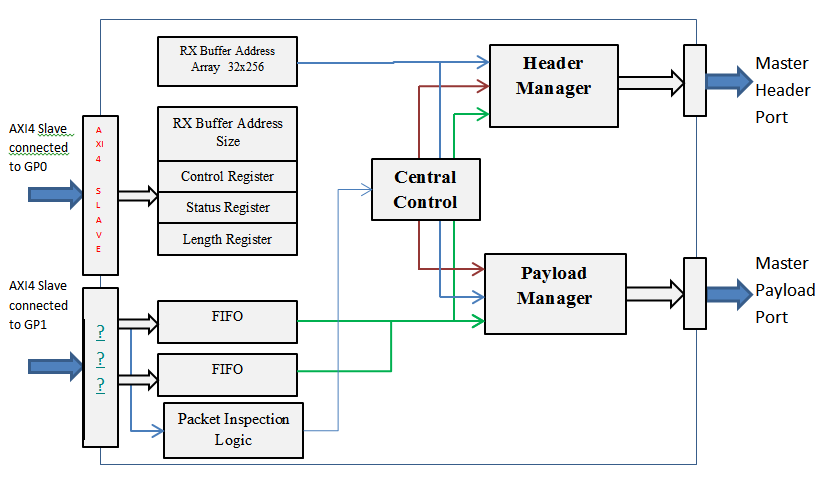 |
| Figure 1: Inside the Ethernet Packet Processing Unit |
A simplified Block Diagram of the connections to Zynq PS and Ethernet Packet Processing unit is as shown below.
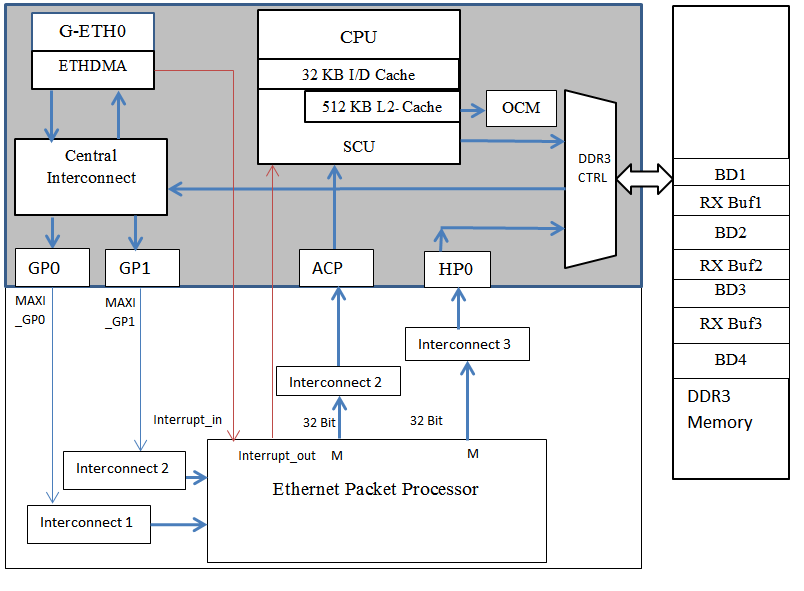
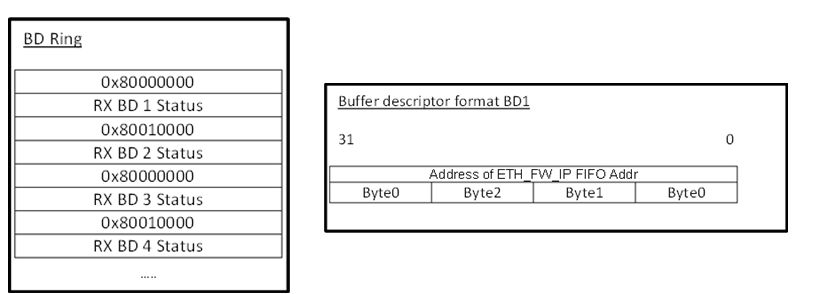
The PS GEM Ethernet driver (xilinx_xemacps.c )has been modified to push the data to Packet Processing Unit FIFOs connected to the MAXI_GP1 port. The buffer addresses allocated by the Linux OS are preserved in the Packet Processing Unit’s RX Buffer Address Registers. The Packet Processing Unit will then use this addresses preserved in the RX Buffer Array Registers to push data the received data from PS EMAC to memory. This process has to be done for all the Receive Buffer descriptors in the ring to redirect each and every packet to the Packet Processing Unit in the Programmable Logic. Since there are two FIFOs in the design allocated at addressees 0x80000000 and 0x80010000 the address in the Buffer descriptor has to alternately programmed as shown below.
The Receive DMA then copies the packet from the MAC Receive FIFO to the memory address specified in the Receive Buffer Descriptor and then updates the packet status in the status word of the Receive Buffer Descriptor.
However this tech tip describes two different ways of the redirecting Ethernet packets to the ACP as described below.
1. Ethernet Header Inspection with Packet Bifurcation:
In the Ethernet Header Inspection with Packet Bifurcation the received Ethernet packet is redirected to the PL. The PL logic will bifurcate the Ethernet Header and payload portion and redirects the Ethernet header to L2 Cache via ACP port. The payload portion is redirected to DDR3 via the High performance Port.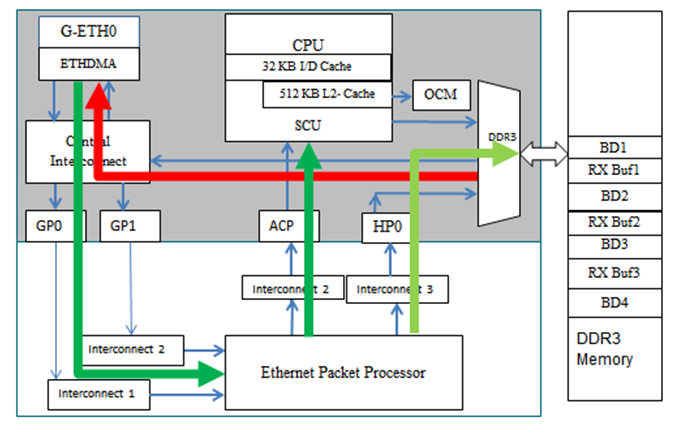
Figure 4: Ethernet Packet Inspection with Packet Bifurcation.
|
| Figure 4: Ethernet Packet Inspection with Packet Bifurcation. |
2. Ethernet Header Inspection without Packet Bifurcation:
In the Ethernet Header Inspection without Packet Bifurcation the whole of the received Ethernet packet is redirected to L2 Cache via the PL and ACP port. In this scenario the whole Ethernet packet is cache coherent.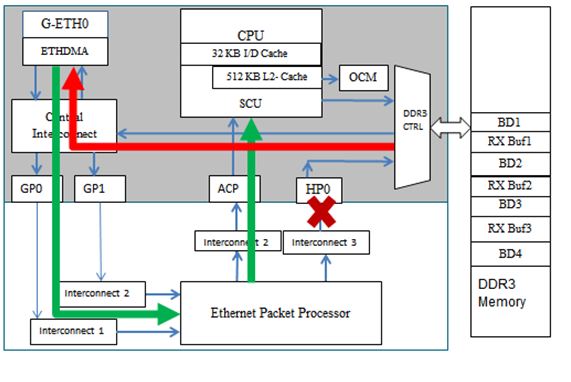 |
| Figure 5: Ethernet Packet Inspection without Packet Bifurcation |
Software Implementation
For this design, the Zynq PS Gigabit Ethernet MAC driver (xilinx_xemacps.c) is modified to redirect the received packet to the Programmable Logic for Packet Inspection and the receive buffers are not made cache coherent. The objective is to ensure that these memory locations are cache resident so that the CPU & Ethernet DMA find them in cache most of the time for optimal throughput.The sections below explain the changes required in the software driver for the design to redirect packets to the PL.
#ifdef PL_ETH_FILTER //Pass DMA addresses to PL Rx Buffer address. xemacps_write(lp->pl_baseaddr,(8*lp->rx_bd_ci)+ PL_ETH_REG_RX_BUFF_ADDR,new_skb_baddr); //Populate PS DMA Adress to FIFO data register. new_skb_baddr=PL_ETH_REG_RX_PL_FIFO_ADDR +((lp->rx_bd_ci%2)<<16); #endif /* the packet length */ len = cur_p->ctrl && XEMACPS_RXBUF_LEN_MASK; skb = lp->rx_skb[lp->rx_bd_ci].skb; rmb(); #ifdef PL_ETH_FILTER u32 new_skb_baddr_bd=xemacps_read(lp->pl_baseaddr,(8*lp->rx_bd_ci)+ PL_ETH_REG_RX_BUFF_ADDR); lp->rx_skb[lp->rx_bd_ci].mapping=new_skb_baddr_bd; lp->rx_skb[lp->rx_bd_ci].len=XEMACPS_RX_BUF_SIZE; #endif
Since the tech tip compares and contrasts two different methodology of packet inspection, there are two different driver patches which will perform the following functions.
1. psgem-packet-bifurcation-logic.patch:
The following Ethernet driver patch redirects the received packet to the Programmable Logic for Packet Inspection. The patch also ensures that the header portion of the packet is cache coherent and invalidates the payload portion of the packet to ensure the CPU reads the correct payload data present in the DDR3 memory.
The sections below explain the changes required in the software driver for the design to take advantage of cache coherent transactions.
/*new_skb_baddr = (u32) dma_map_single(lp->ndev->dev.parent,

 new_skb->data,

 XEMACPS_RX_BUF_SIZE,

 DMA_FROM_DEVICE);*/


 new_skb_baddr =virt_to_phys(new_skb->data);


#define HEADER_OFFSET 64


 dma_sync_single_for_cpu(lp->ndev->dev.parent,

 lp->rx_skb[lp->rx_bd_ci].mapping + HEADER_OFFSET,

 lp->rx_skb[lp->rx_bd_ci].len-HEADER_OFFSET,

 DMA_FROM_DEVICE);
2. psgem-packet-full-acp.patch:
The following Ethernet driver patch ensures that the received Ethernet packet is redirected to ACP via the Programmable logic. The patch also ensures that the whole packet is cache coherent with the CPU.
The sections below explain the changes required in the software driver for the design to take advantage of cache coherent transactions.
/*new_skb_baddr = (u32) dma_map_single(lp->ndev->dev.parent,

 new_skb->data,

 XEMACPS_RX_BUF_SIZE,

 DMA_FROM_DEVICE);*/

 new_skb_baddr =virt_to_phys(new_skb->data);
The steps to apply the patch have been described in the appendix section of this document.
Implementation
| Implementation Details |
|
| Design Type |
PL |
| SW Type |
Linux |
| CPUs |
Dual ARM Cortex-A9 800MHZ |
| PS Features |
|
| PL Features |
Custom IP(Ethernet Packet Processing Unit ) |
| Boards/Tools |
ZC706 |
| Xilinx Tools Version |
IDE 14.6 |
| Files Provided |
|
| Zynq7000AP_SoC_Ethernet_Packet_Inspection_Linux_design.zip |
See Appendix A for the descriptions of the files |
Step by Step Instructions
Setting up the ZC706 Board and running the precompiled images.
- Copy the Zynq7000AP_SoC_Ethernet_Packet_Inspection_Linux_design.zip file to your hard drive and unzip the file to C drive.
- The compiled bitstream and linux images present in the C:\ Zynq7000AP_SoC_Ethernet_Packet_Inspection_Linux_design\packet_bifurcation\sdcard_images directory.
If you would like to generate the bitstream and compile the linux image and u-boot, the steps are provided in the appendix section of this document. - Copy the files present in sdcard_images directory to your SD card.
- Power off your board by sliding the power switch away from the power socket.
- Confirm that your Linux SD card is properly seated in its socket.
- Set the boot mode switch SW16 to SD boot mode.

Figure 6: Boot Strap Settings for Booting From SD CARD - Connect the UART port of the board to your PC.
- Power your board on by sliding the power switch towards the power socket.
- Open a Serial Terminal (Like Hyperterminal or Teraterm) configured at following settings
- Baudrate: 115200
- No of bit s: 8
- Parity : 1
- Flow Control : NONE
- Look out for Linux boot up messages in the terminal.
Figure 7: Viewing the Linux Boot up messages - Assign the board an IP address using the following command.
$ifconfig eth0 192.168.1.10 - You will be able to see the initialization process as shown below. The initialization sequence displays the debug prints of the Ethernet driver indicating that the packet is being routed to PL at addresses 0x80000000 and 0x80010000.

Figure 8: Initializing the Buffer descriptors to redirect packets to Programmable Logic - Ping the board from the Linux PC to check for basic connectivity.
Steps for running the Ethernet Packet redirection to Full ACP Design.
In order to run the Ethernet Full Packet redirection to ACP Design, follow the steps Generating the Hardware Design and ZC706 board setup for the design files and sdcard files present in the C:\ Zynq7000AP_SoC_Ethernet_Packet_Inspection_Linux_design\packetredirect-acp” directory.
Test Results
Netperf is used as the testbench for measuring Ethernet performance. It is a data transfer application running on top of the TCP/IP stack and operates on a client-server model. Netperf works with a concept of message size. Message size indicates TCP payload size. The actual frame size on line includes overheads (TCP and IP headers and Ethernet headers) in addition to the message size.The command for message size variation is: - "netperf -H <ip> -- -m <msg_size>"
Note: Due to networking stack implementation changes in different kernel versions, results are expected to vary when tests are run on various platforms.
The test setup would contain a Linux PC connected back to back with the Zynq ZC706 board using an Ethernet cable.
 |
| Figure 9: Basic setup for testing performance |
The netserver and the netperf executable are present on the SD Card directory.
After the Linux is booted on the ZC706 board, the netperf application on the sd card can be accessed by mounting the sdcard filesystem.
The command to mount the sdcard in linux is as given below.
$ mount /dev/mmcblk0p1 /mnt
| Message size |
TX(Mbps) |
RX(Mbps) |
| 64 |
12.67 |
29.53 |
| 128 |
22.65 |
59.36 |
| 256 |
44.13 |
118 |
| 512 |
85.85 |
221.46 |
| 1024 |
213.83 |
388.73 |
| 1494 |
281.39 |
463.07 |
| 1500 |
367.96 |
618.56 |
| Message size |
TX (Mbps) |
RX (Mbps) |
| 64 |
12.67 |
47.10 |
| 128 |
22.65 |
96.63 |
| 256 |
44.13 |
118.85 |
| 512 |
85.85 |
246.18 |
| 1024 |
213.83 |
381.88 |
| 1494 |
281.39 |
717.19 |
| 1500 |
367.96 |
933.24 |
Conclusion:
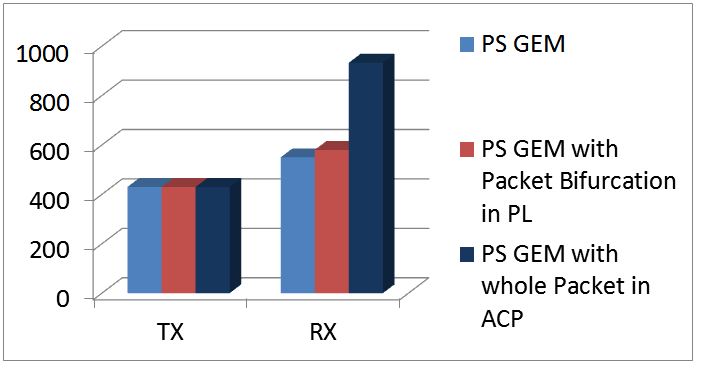 |
| Figure 10: Comparison of PS GeM Performance |
The above figure shows the throughput variation for PS-GEM. It can be clearly seen that use of ACP provides performance benefits over use of HP port or the normal central interconnect path. It is seen that there is a significant boost in PS GEM receive throughput by redirecting the whole packet to L2 cache via the ACP port. A possible reason could be that data received is resident in cache when handed off to AXI-DMA or TCP/IP stack resulting in more cache hits for transactions.
The packet bifurcation logic provides a little increase in Rx performance. Though the Ethernet header is resident in the cache , the payload data which is in the DDR3 memory is read a at a slower rate bringing down the performance of the Ethernet port. The advantage of the packet bifurcation logic is that it does not allow cache to be congested as only header portion is resident in the cache and the CPU gets enough time to process the header. This can be a useful method for router applications where header processing is required.
Appendix A: File Descriptions in the Zynq7000AP_SoC_Ethernet_Packet_Inspection_Linux_design
- Zynq7000AP_SoC_Ethernet_Packet_Inspection_Linux_design
- Packet bifurcation
- design:- Contains the supported design files for the packet bifurcation design
- sw:- Contains the Linux driver patch for the packet bifurcation design
- sd_card_images: - Contains the precompiled linux binaries and the boot images for the packet bifurcation design
- Packetredirect-ACP
- design:- Contains the supported design files for redirecting the whole packet to ACP design
- sw:- Contains the Linux driver patch for the packet bifurcation design for redirecting the whole packet to ACP design.
- sd_card_images: - Contains the precompiled linux binaries and the boot images for the for redirecting the whole packet to ACP design.
- Packet bifurcation
Appendix B: Generating the Hardware Design
- Open the Xilinx Platform Studio(XPS) Tool
- Select Open Project to open the existing project.
- Browse to the C:\ Zynq7000AP_SoC_Ethernet_Packet_Inspection_Linux_design\packet_bifurcation\design” folder where the XPS project is present.
- Select the system.xmp file and select ok.
- The XPS tool should show the project open.
- Select the Bus Interfaces tab and see the connections made to Packet Processing Unit.

Figure 11:Project View - Select Project -> Export Hardware Design to SDK. This will launch the “Export Hardware Design to SDK” dialog.
- Ensure “Include bitstresam and BMM file” option is checked and click the “Export Only” button. Wait until the whole design is compiled and the bit stream is generated.
Appendix C: SDK Flow
This section describes how to use SDK to compile the First Stage Boot Loader (FSBL) and how to create a Linux Zynq boot image. For detailed information on SDK, the Zynq boot image format and boot process, refer to UG821 [4] .
Creating a Hardware Platform Specification
The Hardware Platform Specification is obtained by running XPS Export to SDK tool. It generates an XML file (system.xml) that describes the hardware system including PS and PL components and C source files that initialize the PS (ps7_init.c/h). Follow the steps below to create a Hardware Platform Specification SDK project.- To open SDK, select Start > All Programs > Xilinx Design Tools > ISE Design Suite 14.6 > EDK > Xilinx Software Development Kit.
- Browse to C:\ Zynq7000AP_SoC_Ethernet_Packet_Inspection_Linux_design\packet_bifurcation\sw\workspace directory for Workspace and click OK.
- Click OK.
- Close the welcome screen.
- From the menu bar, select File > New > Project
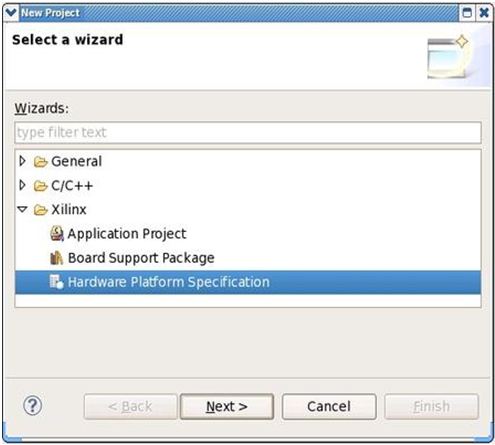
- In the New Project wizard, select Xilinx > Hardware Platform Specification.
- Click Next.
- Enter “14.6_hw_platform” in the Project Name field and Browse to the export location of the hardware specification file (C:\ Zynq7000AP_SoC_Ethernet_Packet_Inspection_Linux_design\packet_bifurcation\design\SDK\SDK_Export\hw\system.xml).
- Click Finish.
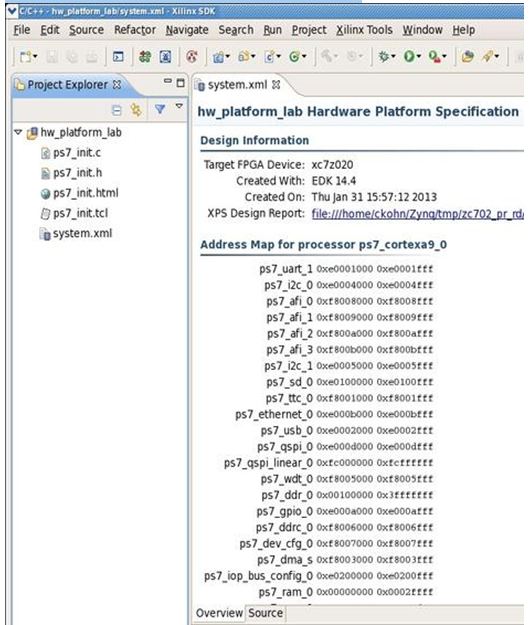
- You can see the imported hardware platform files in the Project Explorer. The system.xml file contains address map information for PS and PL cores.
Create the First Stage Boot Loader Executable File
- Open SDK.
- In SDK, select File > New > Application Project.
The New Project wizard opens.
Use the information in the table below to make your selections in the wizard screens.
| Wizard Screen |
System Property |
Setting or Command to Use |
| Project Name |
fsbl |
|
| Use Default Location |
Select this option |
|
| Application Project |
Hardware Platform |
14.6_hw_platform |
| Processor |
PS7_cortexa9_0 |
|
| OS Platform |
Standalone |
|
| Language |
C |
|
| Board Support Package |
Select Create New and provide the name of fsbl_bsp. |
|
| Templates |
Available Templates |
Zynq FSBL |
- Click Finish. The New Project Wizard closes.
SDK creates the fsbl application project and the fsbl_bsp BSP project under the project explorer. SDK also automatically compiles the project and generates the fsbl.elf file.
Appendix D: Building Linux Components
This section describes how to build Linux specific components i.e. the second stage boot loader u-boot, the Linux kernel image and device tree blob, and the Linux root file system. To complete this section, you are required to have a Linux development PC with the ARM GNU cross compile tool chain and the Git tool installed. Make sure you have your PATH and CROSS_COMPILE environment variables set correctly. You can use the corkscrew tool if you are having difficulties accessing Xilinx git repositories from behind a firewall.
Building the u-boot Second Stage Boot Loader
This section explains how to download the sources, configure, and build the u-boot second stage boot loader. For additional information, refer to the Xilinx Zynq u-boot wiki.
Clone the latest Zynq u-boot git repository from the Xilinx git server.
$ git clone git://github.com/xilinx/u-boot-xlnx.git

$ cd u-boot-xlnx
$ make ARCH=arm zynq_zc70x_config
$ make ARCH=arm
$ mv u-boot u-boot.elf
This section explains how to download the sources, configure, patch, and build the Linux kernel image and the device tree blob. For additional information, refer to the Xilinx Zynq Linux wiki.
Linux Kernel Image
Clone the xilinx-v14.6 tagged Zynq Linux kernel git repository from the Xilinx git server$ git clone -b xilinx-v14.6 git://github.com/xilinx/linux-xlnx.git $ cd linux-xlnx
$ cp Zynq7000AP_SoC_Ethernet_Packet_Inspection_Linux_design/packet_bifurcation/sw /psgem-packet-bifurcation-logic.patch .

$ git apply --stat psgem-packet-bifurcation-logic.patch

$ git apply --check psgem-packet-bifurcation-logic.patch

$ git am psgem-packet-bifurcation-logic.patch //apply the patch//
$ cp Zynq7000AP_SoC_Ethernet_Packet_Inspection_Linux_design/packetredirect-acp/sw / psgem-packet-full-acp.patch

$ git apply --stat psgem-packet-full-acp.patch

$ git apply --check psgem-packet-full-acp.patch

$ git am psgem-packet-full-acp.patch// apply the patch
$ make ARCH=arm xilinx_zynq_defconfig
$ make ARCH=arm uImage modules UIMAGE_LOADADDR=0x8000
Linux Device Tree Blob
Compile the Base TRD device tree file. The output of this step is a device tree blob which can be found at linux-xlnx/devicetree.dtb$ ./scripts/dtc/dtc -I dts -O dtb -o devicetree.dtb ./arch/arm/boot/dts/zynq_ZC706.dts
Make a Linux Bootable Image for SD CARD
- In SDK, select Xilinx Tools > Create Zynq Boot Image.The Create Zynq Boot Image wizard opens.
- Provide the fsbl.elf path in the FSBL ELF tab. Note: You can find fsbl.elf in workspace\fsbl\Debug directory.
- Add the system.bit file present in workspace\14.6_hw_platform directory.
- Add the U-Boot image present in present in workspace\14.6_hw_platform.
- Click Create Image.
- The Create Zynq Boot Image window creates following files in the specified output folder:
- bootimage.bif
- u-boot.bin
- u-boot.mcs
- Rename the u-boot.bin file to BOOT.bin to create the boot image for the SD card.
© Copyright 2019 - 2022 Xilinx Inc. Privacy Policy