Zynq UltraScale MPSoC Base TRD 2016.3 - Design Module 1
Zynq UltraScale MPSoC Base TRD 2016.3 - Design Module 1
Return to the Design Tutorials Overview.
Design Overview
This design module showcases the following:
- Boot APU only
- FSBL, ATF, U-boot, PMU-FW
- APU OS: SMP Linux
- Ethernet via FTP/SCP
- Serial console via UART0
- File system via SD, USB or SATA
- Standard Linux applications on rootfs

Design Components
- pmu_fw
- petalinux_bsp
- zynqmp_fsbl
- bl31
- u-boot
- kernel
- device tree
- rootfs
Build Flow Tutorials
PMU Firmware
The pmu_fw application is a bare-metal application that executes on the PMU MicroBlaze. It is loaded by the CSU early on in the boot process before the FSBL executes. The application's primary responsibility is to handle platform management.
Create a new XSDK workspace.
% cd $TRD_HOME/pmu/pmu_fw
% xsdk -workspace . &&
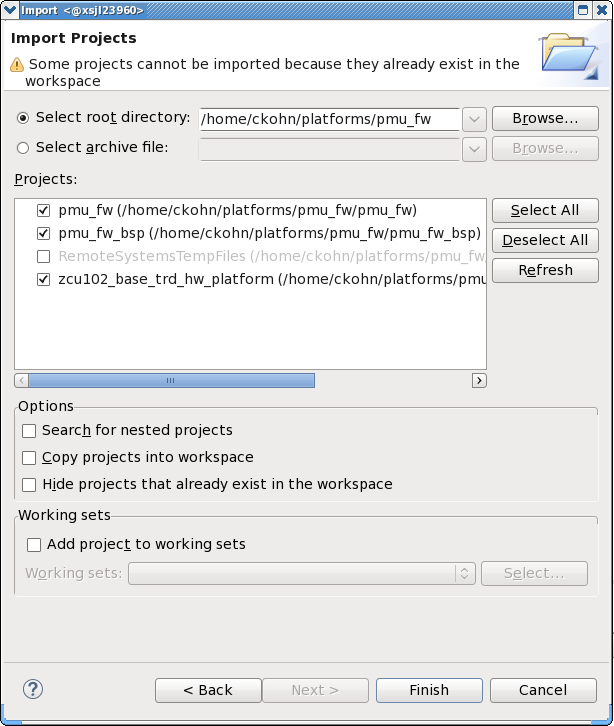
- Click 'Import Project' from the welcome screen, browse to the current working directory and make sure the pmu_fw, pmu_fw_bsp, and zcu102_base_trd_hw_platform projects are selected. Click Finish.
- Right-click the pmu_fw project and select 'Build Project'.
Copy the generated pmu_fw executable into the PetaLinux BSP.
cp $TRD_HOME/pmu/pmu_fw/pmu_fw/Debug/pmu_fw.elf $TRD_HOME/apu/petalinux_bsp/images/linux
Petalinux BSP
This tutorial shows how to build the Linux image and boot image using the PetaLinux build tool.
Configure the PetaLinux project.
% cd $TRD_HOME/apu/petalinux_bsp
% petalinux-config --get-hw-description=./hw-description --oldconfig
Select the device-tree matching design module 5 and build all Linux image components
% cd subsystems/linux/configs/device-tree
% cp system-dm1.dts system-top.dts
% petalinux-build
% cd -
Create a boot image.
% cd images/linux
% petalinux-package --boot --bif=dm1.bif --force
Copy the generated boot image and Linux image to the dm1 SD card directory.
% mkdir -p $TRD_HOME/images/dm1
% cp BOOT.BIN image.ub $TRD_HOME/images/dm1
Run Flow Tutorial
- See here for board setup instructions.
- Copy all the files from the $TRD_HOME/images/dm1 SD card directory to a FAT formatted SD card.
- Power on the board to boot the images; make sure all power rail LEDs are lit green.
- The user can now see the linux-boot on the serial console:

Upon completion of the linux-boot, use the below login and password to log into the framebuffer or serial console:
root@Xilinx-ZCU102-2016_3 login: root
password: root
- The SD card file system is mounted at /media/card
References
- How to mount a USB3 or SATA hard drive:
http://www.wiki.xilinx.com/SATA
http://www.wiki.xilinx.com/Zynq+Ultrascale+MPSOC+Linux+USB+device+driver (under host mode)
© Copyright 2019 - 2022 Xilinx Inc. Privacy Policy