Zynq UltraScale MPSoC 2016.2 - Tutorial for design module 9
Zynq UltraScale MPSoC 2016.2 - Tutorial for design module 9
Abstract
- Qt module to visualize performance counters
- o Plot graph instead of printing to UART0
- o Use IPC, same as design 4
Table of Contents
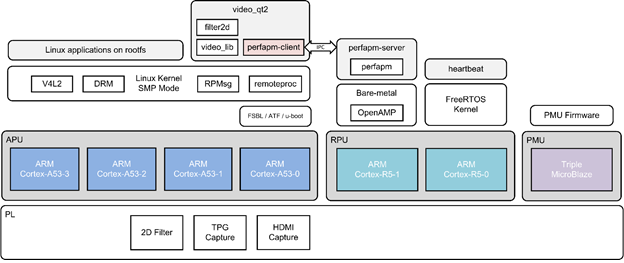
Block Diagram
Component Diagram
The below figure shows an overview of all the projects provided in this package as well as inter-dependencies and generated output products. The following sections show step-by-step instructions for rebuilding all project components. Note that pre-built components are depicted as dashed lines and therefore the corresponding build steps are optional and can be skipped (see [Optional] marking). The Vivado hardware design is packaged as part of the SDSoC platform and shall therefore be built through the SDSoC tool flow only.

Source Code
- Create workspace folder
- Checkout the source code for Linux
This creates a folder “zynqmp_petalinux_bsp” and gets all source files from git repository
- Perf APM, client.
- Video application (command line app, Qt app, Video Library)
- Base TRD, SDSoC platform and with 2D filter sources
- Checkout the source code for PMU FW
This creates a folder “pmu_fw” and gets all source files from git repository
- Checkout the source code for Heartbeat application
- Checkout the source code for Perf APM, server
How to build Images
Build PMU FW Image
The pmu_fw (PMU Firmware) application is a bare-metal application that executes on the PMU MicroBlaze. It is loaded by the CSU early on in the boot process before the FSBL executes. The application's primary responsibility is to handle power management.Launch the Xilinx software development kit (XSDK) from the console.
$ cd pmu_fw
$ mkdir workspace // create a workspace
$ xsdk &
- Close the Welcome screen and import the PMU firmware projects.
- Click File -> Import... -> General -> Existing Projects into Workspace and click Next.
- Navigate to the $TRD_HOME/pmu_fw directory using the Browse button.
- Select the pmu_fw, pmu_fw_bsp, and zcu102_base_trd_hw_platform projects.
- Click Finish.
<< PICTURE >>
- Build the imported projects:
- Right-click on the pmu_fw project and select Build Project.
- The generated elf file will be placed at pmu_fw/Debug/pmu_fw.elf.
- Use this image while generating SD card images (detailed below).
Build Kernel Images
- Goto the Petalinux BSP folder
- Hardware configuration
Note:
If the default github is not accessible, change it to gitenterprise as below.
Linux Components Selection à Remote linux-kernel settings à edit the Remote linux-kernel git URL to: https://gitenterprise.xilinx.com/PAEG/linux-xlnx.git
Linux Components Selection à Remote linux-kernel settings à edit the Remote git TAG/Commit ID to: 2016.2/4.4
- Modifications in Device tree
$ vi subsystems/linux/configs/device-tree/system-top.dts
Comment fmc-hdmi-cam.dtsi, pl.dtsi, openamp-overlay.dtsi
/*#include "fmc-hdmi-cam.dtsi"*/
/*#include "pl.dtsi"*/
/*#include "openamp-overlay.dtsi"*/
Save this file.
- Build the images
This completes the Linux kernel image build
Generate SD Card Images
SD Card images are generated as part of the petalinux-build command above. However, to include the pmu_fw image, follow the below steps:
- Goto the SD card images folder
$ cd zynqmp_petalinux_bsp/images/linux
- Copy the pmu_fw binary into the SDSoC platform
$ cp pmu_fw/Debug/pmu_fw.elf
- Create a BIF file (filename: boot.bif) with below content:
the_ROM_image:
{
[fsbl_config] a53_x64
[pmufw_image] pmu_fw.elf
[bootloader] zynqmp_fsbl.elf
[destination_cpu=a53-0] bl31.elf
[destination_cpu=a53-0] u-boot.elf
}
- Run the command
$ bootgen -arch zynqmp -image boot.bif -w -o boot.bin
This will create boot.bin file with new pmu_fw image.
How to Execute
- Copy the below files onto SD card (root folder)
boot.bin
- Insert the SD card into zcu102 board
- Connect power cable and UART cable
- Start TeraTerm or any other terminal application on Host PC (to view serial port messages)
- Power ON the board
- The board starts booting, observe for PMU FW messages followed by Linux boot messages
Related Links
© Copyright 2019 - 2022 Xilinx Inc. Privacy Policy