HSI debugging and optimization techniques
In this article we shall discuss the hardware hand-off (HWH) between Vivado, and the Vitis, or Petalinux. We shall discuss how this is achieved, and from this understanding allow users to debug potential issues that may arise in this hand-off. Finally, we will discuss how to utilize these hand-off features in order to automate the application of targeted applications for users hardware devices or platforms using HSI.
Table of Contents
Note:
What is the HSI:
In order to build a targeted platform for a device, whether it be baremetal or Kernel, then the tools need to be aware of the hardware system. The Xilinx tools such as Vitis, and Petalinux use a set of TCL based utilities calledHardware Software Interface (HSI) to obtain this information. In this tutorial, we shall explore these HSI API, and how these are used to build the BSP, and devicetree in Linux.
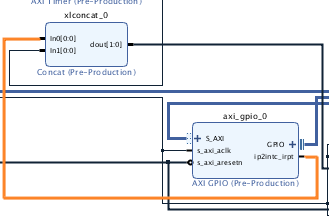
The hardware that we will use in this demo is shown below. This was created in Vivado IP Integrator 2020.1. The Block Design (BD) is seen below
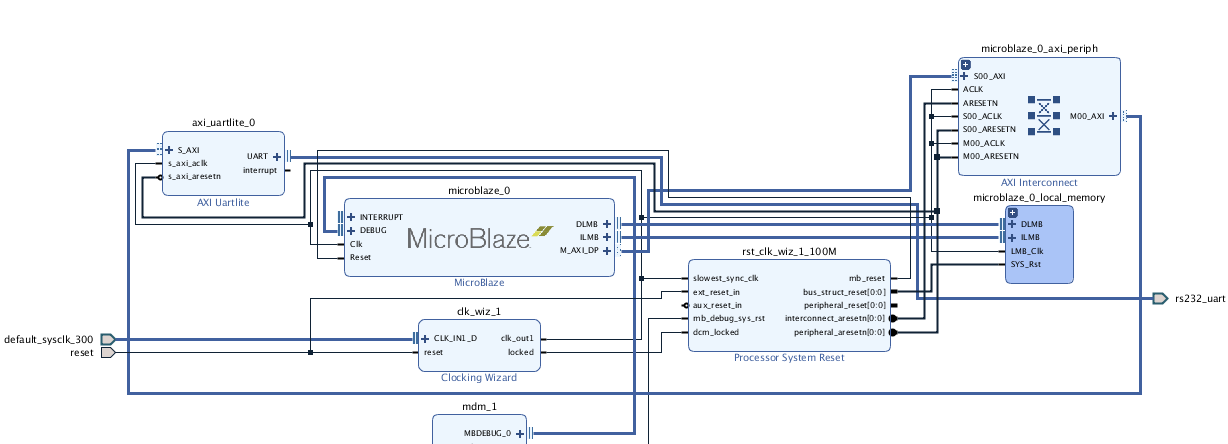
For more information on the Embedded flow within Vivado, see the guide here
The Hardware Definition File (XSA):
The XSA (Xilinx Support Archive) is a container file that contains all the information needed to build a platform for a users target device. One of the files here is the Hardware Handoff File (HWH) .This HWH file is created when the output products is ran on a Block Design (BD). Only the information in the Block Design (BD) will be contained in the HWH. The HWH file is used by the software tools to abstract all the information needed to build a targeted application to a users device; such as the CPU (or CPUs), Buses, IP and the ports and pins used in the system such as interrupts. Since I am targeting a Zynq Ultrascale here, the XSA will also contain the psu_init.c/h, and tcl files. The psu_init.c/h files are used in the FSBL to configure the Processing Subsystem with the configuration I set in the IP configuration wizard in Vivado. The psu_init.tcl is used by the debugger to perform the same task. There is also psu_init_gpl.c/h if users want to config the PSU in uboot. If users have an address mapped BRAM system in the PL, or the FPGA for non SoC devices, then there would be an MMI file that would be used in Updatemem to populate the BRAM with my ELF created in Vitis.Xilinx Software Commandline Tool (XSCT):
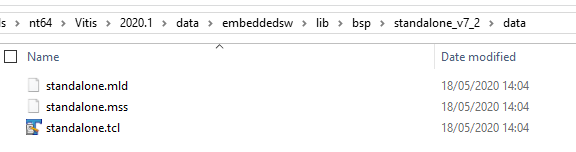
We shall be using the Xilinx Software Commandline Tool (XSCT) to explore the XSA file. The XSCT is delivered with Vitis, and is an ‘umbrella’ tool that covers; HSI, XSDB, Bootgen, and the debugger. Which means that everything we can achieve in the Vitis tool, can be achieved on the command line too. This is very useful for users that wish to automate the process. In this tutorial we will be using the HSI API to open and explore the HWH information in the XSA.Below we can see a screenshot of the Vitis install. Here, the standalone.tcl file is used to create the BSP. The entry point being the generate proc in this TCL file. Debugging HSI issues in the BSP is discussed later on in this article.
The HSI is also used in all the drivers, and libraries delivered in the Vitis tool too. For example, the LwIP library delivered in the Vitis is the open source LwIP library that has a port (wrapper), that will be tailored to work on your target device. The LwIP uses the HSI API to abstract this hardware information; such as the Ethernet IP, timer, and interrupt connections in the system to populate the port information. The HSI API is also used in the devicetree generator in Petalinux to populate the devidetree for the linux kernel.
So, as we can see the HSI API is used in a lot of places in the Xilinx tools, so it is important that users be aware of how this is works, and how to fix or patch any issues that might arise here.
Extracting HW info using HSI from the XSCT command line:
To see a list of all the HSI API, users can use the help:help -category hsi
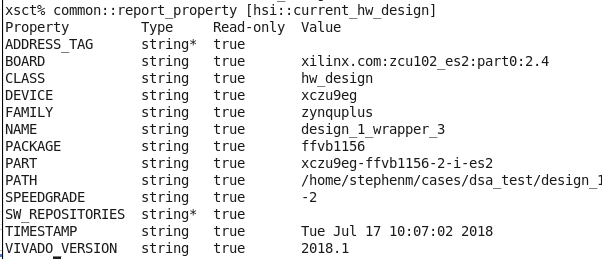
So, let’s launch the XSCT and explore the XSA:
hsi::open_hw_design design_1_wrapper.xsa
We can look at all the IP in the HWH:
hsi::get_cells * -hier
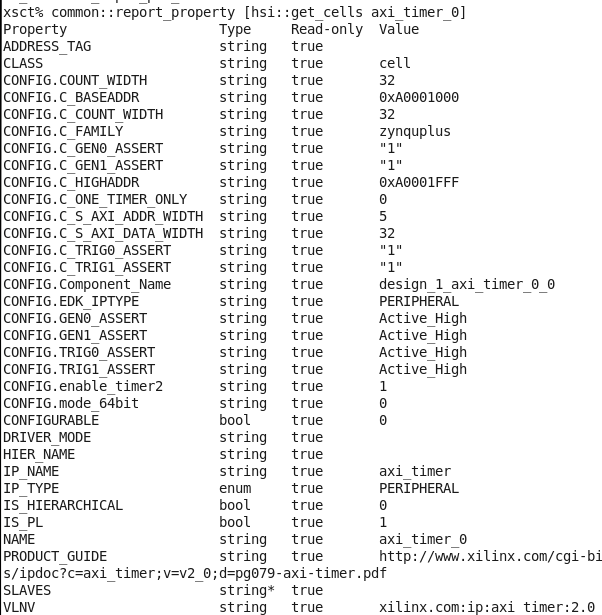
If I want to return the properties of a certain IP. I can use the command below:
common::report_property [hsi::get_cells axi_timer_0]
We can use the information here to filter our search. For example, if I just want to return the processors in the HWH:
hsi::get_cells * -hier -filter {IP_TYPE==PROCESSOR}
hsi::get_pins *
hsi::get_pins -of_objects [hsi::get_cells axi_timer_0]
hsi::get_pins -of_objects [hsi::get_cells axi_timer_0] -filter {TYPE==INTERRUPT}
hsi::get_mem_ranges -of_objects [lindex [hsi::get_cells * -filter {IP_TYPE==PROCESSOR}] 0]
Internal HSI utilities:
There are also some HSI utilities that is used by the Vitis that use these API on the back-end that users would need to be aware of if attempting to debug HSI issues. The user can source these tcl scripts, and utilize them in their own scripts. These HSI utils can be found in the Vitis install: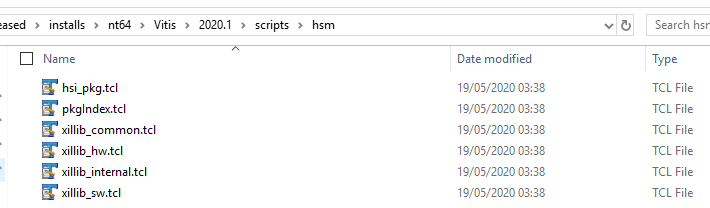
For example, a useful utility here is ::hsi::utils::get_sink_pins. This can be used to find all the pins connected to another pin. For example, if users want to see where the interrupt port on s particular IP is connected to:
Using these utilities is particularly useful when attempting to isolate issues relating to the BSP generation in Vitis. For example, let’s imagine that there is an issue in the BSP containing the LwIP library. Here, we can source the utilities from the Vitis install, and source the
LwIP TCL, and execute the procs within this LwIP TCL in order to narrow down on the root cause of the BSP generation failure. For example, here I have run the get_emac_periphs proc within the lwip tcl:
source <path to Vitis install>/scripts/hsm/xillib_hw.tcl
source <path to Vitis install>/data/embeddedsw/ThirdParty/sw_services/lwip202_v1_1/data/lwip202.tcl
get_emac_periphs [hsi::get_cells psu_cortexa53_0]
Using the HSI to create software applications:
There are HSI API that users can use to create software applications. Users can use the templates such as zynqmp_fsbl, hello_world ect similar to how this can be acheived in the Vitis GUI to create applications on the commandline.For example, to create a ZynqMP FSBL the HSI command is:
- hsi::generate_app -app zynqmp_fsbl -proc cortexa53_0 -dir zynqmp_fsbl -os standalone -compile
Use the command below to get a list of all the supported templates:
- hsi::generate_app -lapp
Users can also change the compiler options. For example, in the FSBL if users are targetting the ZCU102 development board, then the XPS_BOARD_ZCU102 symbol should be passed to the compiler as there is some board specicif configuration
in the fsbl for the zcu102/6 boards. This would look like:
set fsbl_design [hsi::create_sw_design fsbl_1 -proc [lindex [get_processor] 0] -app zynqmp_fsbl]
common::set_property APP_COMPILER "aarch64-none-elf-gcc" $fsbl_design
common::set_property -name APP_COMPILER_FLAGS -value "-DRSA_SUPPORT -DFSBL_DEBUG_INFO -DXPS_BOARD_ZCU102" -objects $fsbl_design
hsi::generate_app -dir zynqmp_fsbl -compile
Utilizing the HSI to automate boot image creation:
The HSI can also be used to automate the application creation based upon the hardware. Taking the Hardware design above, we can use the HSI to do the following information in order to automate the boot image creation.
- Determine the device family
- Determine the target platform (ie if xilinx development board)
- Determine the configuration of the PSU to determine the bootmode
- Determine the serial port
- Create the FSBL targeting the SoC processor
- Create the PMUFW if the Zynq Ultrascale device is detected
- Create the BIF file specific to target device.
Using the hardware design above, here we can extract the hardware device information:
For example, users can create a proc to extract the family information:
proc get_device_family {} {
    return [common::get_property FAMILY [hsi::current_hw_design]]
}
proc get_processor {} {
    set processor [hsi::get_cells * -filter {IP_TYPE==PROCESSOR}]
    if {[llength $processor] != 0} {
        return $processor
    }
    return 0
}
proc get_serial {} {
    set uart [hsi::get_cells *uart*]
    if {[llength $uart] != 0} {
        return 1
    }
    return 0
}
proc get_sd {} {
    set psu_sd [hsi::get_cells * -filter {IP_NAME==psu_sd}]
    if {$psu_sd != ""} {
        return 1
    }
    return 0
}
proc is_development_board {} {
    set board [common::get_property BOARD [hsi::current_hw_design]]
    if {$board != ""} {
        return [lindex [split $board ":"] 1]
    }
    return 0
}
proc get_pl_ip {} {
    set pl_ip [hsi::get_cells * -filter {IS_PL==1}]
    if {$pl_ip != ""} {
        return 1
    }
    return 0
}
We can also check if there should be a bit file or not based on the fact if there is any IP in the PL.
proc create_bif {apps} {
    foreach app $apps {
        if {$app == "zynqmp_fsbl"} {
            set fsbl "${app}/executable.elf"
        } elseif {$app == "pmu_fw"} {
            set pmufw "${app}/executable.elf"
        }
    }
    set bit [glob -nocomplain -directory [pwd] *.bit]
    if {$bit == "" && [get_pl_ip] == 1} {
        puts "Warning, there is IP detected in the PL. However, there is no bitstream detected"
    }
    set fileId [open bootgen.bif "w"]
    puts $fileId "the_ROM_image:"
    puts $fileId "{"
    if {[get_device_family] == "zynquplus"} {
    puts $fileId "\[fsbl_config\] a53_x64"
    }
    puts $fileId "\[bootloader\] $fsbl"
    if {[get_device_family] == "zynquplus"} {
    puts $fileId "\[pmufw_image\] $pmufw"
    }
    if {$bit != ""} {
    puts $fileId "\[destination_device=pl\] $bit"
    }
    puts $fileId "}"
    close $fileId
    puts "BIF file created successfully"
}
proc create_boot {xsa} {
    set apps ""
    open_hwh design_1_wrapper.xsa
    if {[get_device_family] == "zynquplus"} {
        if {[get_serial] == 1 && [get_sd] == 1} {
            hsi::generate_app -app zynqmp_pmufw -proc [lindex [get_processor] 6] -dir pmu_fw -compile
            lappend apps "pmu_fw"
            if {[regexp {zcu102} [is_development_board]]== 1} {
                set fsbl_design [hsi::create_sw_design fsbl_1 -proc [lindex [get_processor] 0] -app zynqmp_fsbl]
                common::set_property APP_COMPILER "aarch64-none-elf-gcc" $fsbl_design
                common::set_property -name APP_COMPILER_FLAGS -value "-DRSA_SUPPORT -DFSBL_DEBUG_INFO -DXPS_BOARD_ZCU102" -objects $fsbl_design
                hsi::generate_app -dir zynqmp_fsbl -compile
                lappend apps "zynqmp_fsbl"


            } else {
                hsi::generate_app -app zynqmp_fsbl -proc [lindex [get_processor] 0] -dir zynqmp_fsbl -compile
                lappend apps "zynqmp_fsbl"
            }
        }
        create_bif $apps
        if {[file exists bootgen.bif] == 1} {
            exec bootgen -arch zynqmp -image bootgen.bif -o i BOOT.BIN -w on
        } else {
            puts "BIF file not created!"
        }

    }
    close_hwh

}
Debugging HSI issues in the Board Support Package (BSP) generation in Vitis:
In order to create an application for a target platform (hardware), then the tools need to know the CPU used, the IP in the hardware, the Operating System, and the OS settings; such as where to send the serial input and output data (UART). The tools would also need to know what libraries are used (if any). All this is automated for the user in Vitis and this automation is done using in part, the HSI API.Populating the compiler settings:
Taking the Standalone BSP as an example, the entry point is the generate proc in the standalone.tcl file. Here, we can see that the script will populate the OS compiler settings:proc generate {os_handle} {
global env
set need_config_file "false"
# Copy over the right set of files as src based on processor type
set sw_proc_handle [hsi::get_sw_processor]
set hw_proc_handle [hsi::get_cells -hier [common::get_property HW_INSTANCE $sw_proc_handle] ]
set proctype [common::get_property IP_NAME $hw_proc_handle]
set procname [common::get_property NAME $hw_proc_handle]
set boardname [common::get_property BOARD [hsi::current_hw_design]]
set enable_sw_profile [common::get_property CONFIG.enable_sw_intrusive_profiling $os_handle]
set mb_exceptions false
...
hsi::open_hw_design design_1_wrapper.xsa
hsi::create_sw_design design_1 -proc psu_cortexa53_0

Detecting supported drivers in the BSP:
The BSP compiles the drivers by cross checking the IP_NAME of the IP against the supported peripheral data in each driver MDD file*. For example, let’s take the AXI_TIMER in our hardware:*Note: For libraries this is the MLD file
Here, we can see the IP_NAME is AXI_TIMER. We will now search all the MDD files in the path provided in the Xilinx Tools -> Repository:
Next, go to the <Vitis install>/data/embeddedsw/XilinxProcessorIPLib/drivers and search all the <driver_name>/data/<driver_name>.mdd file for the supported_peripherals option that matches the IP_NAME in the HWH.
For example, for the AXI_TIMER this would be in the tmrctr driver:
OPTION supported_peripherals = (axi_timer);
OPTION driver_state = ACTIVE;
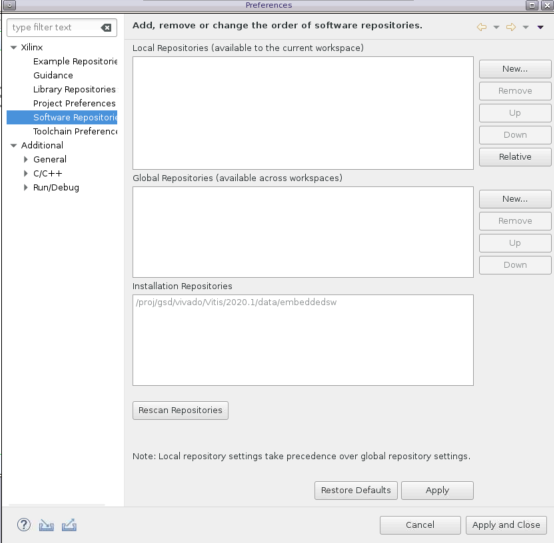
Adding custom BSP, Library, Drivers, or SW Apps to Vitis:
Users can add custom BSPs, Libraries, Drivers, or SW Apps to Vitis workspace under the Local Repositories (shown above). For example, this should look like:- repo/lib/bsp/standalone_1_0
- repo/XilinxProcessorIPLib/drivers/driver_v1_0
- repo/lib/sw_services/my_library_v1_0
- repo/lib/sw_apps/my_app
Note the two levels of hierarchy.
Note: if the same version of the BSP, Driver, or Library is added to the repo as the one found in the Vitis install, then the one in the repo will take preference. Users can update the MLD (or MDD for driver)
for their custom added data. For example, if user has a custom BSP added, then the DESC in the repo/lib/standalone_v7_2/data/standalone.mld file should be updated to differ from the one delivered in the Vitis instal:
OPTION DESC = "Custom Standalone is a simple,..."
If the user is creating the application via the HSI API (similar to above), then the command to add a repo is:
hsi::set repo <path to repo>
Debugging HSI issues in the DeviceTree Generator in Petalinux:
What is the DeviceTree:
The devicetree is a data structure that describes the hardware components of an embedded system so that the kernel can manage those components such as the CPUs, the memory, the buses and the peripherals.The devicetree structure (dts) is created in Petalinux using a utility called the Devicetree Generator (DTG). There is a Yocto recipe in Petalinux that will perform the tasks below:
- Download the devicetree generator source from git
- Switch to a specific branch of the devicetree
- Import the XSA file
- Create the devicetree using the TCL based devicetree generator
- Download the devicetree compiler (DTC)
- Compile the devicetree blob using the DTC.
In the context of this article, we will only be discussing the DTG step (the 4th step above) as this is where the HSI is used to extract the information from the HWH. As we have discussed above, the HWH only contains HW information from the BD. This means the devicetree generated by the DTG will only contain nodes for the HW in the BD. So, external devices such as the PHY and IP on the I2C bus will need to be handled manually. In Petalinux this is handled in the system-user.dtsi in the devicetree recipe in the Petalinux project directory (project-spec/meta-user/recipes-bsp/device-tree/files).
Isolating the devicetree generator:
It is in this DTG stage where most of the potential issues occur. So, in order to debug these potential issues we can isolate the devicetree creation and manually run the DTG to track down any potential issues. This is discussed a little more hereTo generate the devicetree manually, users can download the DTG from Git (see below), or download it manually here.
- mkdir repo/my_dt
- cd repo/my_dt
- git clone https://github.com/Xilinx/device-tree-xlnx
- cd device-tree-xlnx
- git checkout xilinx-v2020.1
- Create a text file with file type .tcl, and copy and paste the contents below and source this TCL from HSI:
proc gen_dts {xsa} {
    open_hw_design $xsa
       set_repo_path ./repo
       set processor [hsi::get_cells * -hier -filter {IP_TYPE==PROCESSOR}]
       set processor [lindex $processor 0]
       create_sw_design device-tree -os device_tree -proc $processor
       generate_target -dir my_dts
}
If a user does see an issue with the DTG code. This can be patched against a specific branch and add this patch the devicetree recipe in Petalinux. For example:
- cd device-tree-xlnx
- git diff xilinx-v2020.1 > 0001_device_tree_update.patch
Patching the devicetree generation recipe in Petalinux:
Then add this 0001_device_tree_update.patch into the project-spec/meta-user/recipes-bsp/device-tree/files folder in the Petalinux project directory. Then update the device-tree-generation_%.bbappend file:SRC_URI_append = " file:// 0001_device_tree_update.patch"
FILESEXTRAPATHS_prepend := "${THISDIR}/files:"
Conclusion and further documentation:
In conclusion, this article just scratches the surface of the HSI utility and how it is used in the platform generation flow. However, hopefully users will have a better understanding of the HSI from reading this article and are in a better position to debug potential issues that may arise here. Also, hopefully users can also appreciate what can be achieved using the HSI API to better automate, or optimize their own custom platform generation. For more information users are strongly advised to review the docs in the Related links below.Related Links
© Copyright 2019 - 2022 Xilinx Inc. Privacy Policy